

How to fix the circuit components in place - part 1
time to plan where everything on the PCB will go. You can rearrange the components as you wish, as long as the wire connections are done correctly after that.
- #2519
- 07 Nov 2025
time to plan where everything on the PCB will go. You can rearrange the components as you wish, as long as the wire connections are done correctly after that.

Probably the robot I like the most from this series of five robots. See the video to understand why and what is interesting and special about this robot.

If you’ve connected everything correctly, you can now turn on the motor and control its speed using the potentiometer.
The potentiometer is the small knob on the motor speed controller that you can rotate.

This is the first Active Pinless Attachment for the Box competition robot. The attachment is placed on the top of the robot and is controlled by one of the motors.
Time to make the final connection and complete the prototype.

You think that you can quickly change the attachments of your LEGO Mindstorms EV3 competition robot? Are you sure? In this first episode of the series you will see how to create and attach attachments without using pins and how faster and easier this could be. You will see the design logic of a few attachments and how they work on the field.
To demonstrate that it does not matter where in the circuit we place the switch, we placed it at the negative battery terminal. However, in practice, it is always better to put it near the positive terminal as it lowers the area that can damage your electronics if accidentally touched by other power sources or grounding.

One more example for an active attachment with a system of gear wheels. This time the system is constructed so that the attachment could lift heavy objects.
You can notice that the two positive terminals are placed in the middle. That is a common practice that has a few functionalities, like shortening the paths on the PCB, but the main purpose is to lower the chance that the power cables connected directly to the battery are more difficult to touch accidentally.

Without the use of any motor, you can still accomplish a number of missions using passive attachments. You can still pull/push on different levers using only a beam or two connected to the frame.
The motor’s contacts are connected by a wire that is wrapped in a special way. When electricity flows through the wire, it creates a magnetic field that makes the shaft spin. The direction the shaft spins depends on which way the electricity flows. If you switch the wires, the shaft will just spin the other way, and nothing bad will happen. The plus (+) and minus (–) marks on the motor only show which way to connect it if you want the shaft to spin in a certain direction.

The Gyro sensor in LEGO Mindstorms EV3 sets is new for the sets and we answer basic questions about its usage. The sensor detect when the whole constructions turns at a particular angle, but there are a number of gotchas in using it.
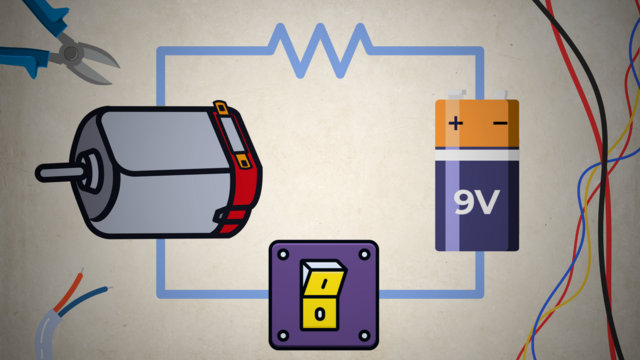
Notice that we connect the switch to the red cables and not the black. That is standard practice aimed at minimizing the points through which power can accidentally be connected to other electrical components. Stopping the power near its source is the best way to do it.

Tasks for the Gyro sensor that you can use in STEM classes, while preparing for a competition or just to explore how the sensor works.
Connecting the other side of the motor directly to the battery will turn it on, but we want a way to control when we turn it on without having to disconnect and reconnect cables constantly. For that reason, we added a switch between one of the connections from the motor to the battery. It may seem easier to use a larger switch, but the DIP switch is meant to be soldered to a PCB, and that is what we'll do in the end.

Gears could be a powerful tool for those who know how to use them appropriately. In this episode we introduce some of the basic terms and concepts behind using gears in your construction.
It doesn’t matter if you connect the wire to the positive (cathode) or the negative (anode) terminal of the battery.
Note that for power sources, the cathode and anode are marked opposite to that of diodes and other electronics. In them, the cathode is the positive terminal and the anode is the negative one.

In this episode, we introduce a LEGO Mindstorms EV3 version of competition robot construction. It is a modular construction, with medium motor for additional attachments and two light or colour sensors for orientating on the field.

Before you connect wires in your project, you need to take off the plastic covering (insulation) at the ends so the metal wire is exposed. This is called stripping the wire. You can do it with a wire stripper or even with simple tools you may have at home.

Turning with the Gyro Sensor on a specified angle and stopping there have never been easy. It is not going to get any better. However, this is not a problem of the Gyro sensor. The problem is in the way we develop our programs.

In this tutorial, we share a tip for organizing robot attachments in the FIRST LEGO League challenge. By designing attachments to hook onto the table edge, you can keep them close at hand for quick swaps, saving time and reducing mistakes.
Options include building hooks into the attachment design or using small separate hooks. This method is used by many teams and is a practical way to stay organized during competitions.

Continuing with the Proportional algorithm for following lines. Smooth and stable this is the first part of the PID.

In this video tutorial, we demonstrate a full run for the FIRST LEGO League 2024-2025 SUBMERGED challenge, completing all missions in a single sequence. Each mission is shown individually beforehand, with close-up views of how the attachments work and the principles behind their design. All attachments are pinless, making them quick to change during the run, though aligning and loading the robot still requires practice. The strategy involves moving from one base to the other while accomplishing as many missions as possible, including retrying those close to base when needed.
While the complete run takes longer than the official 2.5 minutes, the focus here is on demonstrating reliability, consistency, and the trade-offs between time and scoring points. In some cases, missions are skipped to focus on higher-value tasks, but in this run, we aim to complete them all. The result is a strong performance that comes close to the maximum possible score.

This tutorial in an animated demonstration of how a LEGO Education SPIKE Prime moves forward. To download the program check out the courses in which the tutorial is used.

The programming process for accomplishing M01 Coral Nursery, M02 Shark, M03 Coral Reef, and M04 Scuba Diver of the FIRST LEGO League 2024-2025 SUBMERGED Challenge is straightforward, despite covering multiple missions in one run. Each mission is accomplished with a simple and reliable approach that minimizes the impact on overall run accuracy.
The code consists mainly of movement blocks and gyro turns, allowing for consistent navigation between mission models. By keeping the programming uncomplicated, the robot can perform pushing, collecting, and delivering tasks efficiently without introducing unnecessary complexity, ensuring a smooth and dependable multi-mission run.

Rubber bands in the LEGO Mindstorms sets are very handy when it comes to collecting objects, especially loops. The mechanism most of the time could work like this - an axle is pushed, a rubber band is released and a lever collects the loop.

The programming process for accomplishing M01 Coral Nursery and M03 Coral Reef of the FIRST LEGO League 2024-2025 SUBMERGED Challenge is straightforward, focusing on controlled movement and stability. The motor-powered attachment lifts the coral tree smoothly to the coral tree support while also delivering reef segments outside the launch area.
The robot moves forward to position itself, raises the coral tree, and then returns to base. To ensure the reef segments remain secure during the run, the program uses slow acceleration and reduced speed when needed. This simple yet reliable approach keeps the sequence easy to execute while maintaining consistency in performance.