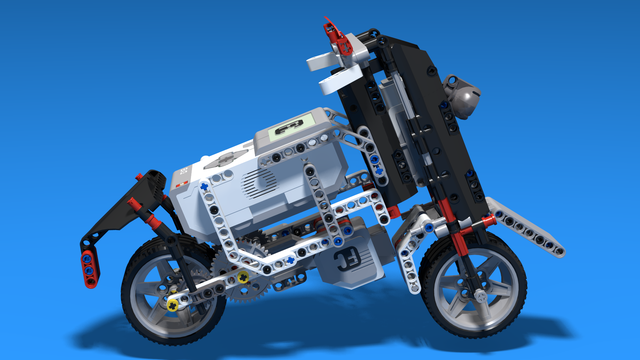

How LEGO robots turn
The robot is equipped with two motors, one for each side. As a result, whenever the robot turns, it always follows an arc path. The size and radius of this arc can vary depending on the turn.
- #1341
- 14 Jun 2019
The robot is equipped with two motors, one for each side. As a result, whenever the robot turns, it always follows an arc path. The size and radius of this arc can vary depending on the turn.
Building instructions for the barrier mission model. The model is used in the Parking Control mission of FLLCasts Off-season Challenge 2019.
The seventh level of the Robotics with LEGO curriculum for students in sixth or seventh grade.
In this level, student develop a memory training game. The player must remember series of actions like press a button, shake a pole, pull a lever, show one of many colors. In order to program the game, students use many variables and modify their states. Students create their own custom sounds and images, in order to reflect their own personality in the game. In the end of the level, the game stores top scores even after a full shut down with the help of text files.
An awesome ski-jet robot, steering with a medium motor and powered by a single large motor. It also has a pair of inclined treads, making it especially well-suited for the harsh winter terrain.
*There is a mistake in this robot you will have to find. How would you make it work?
A phone holder that rings an alarm when the phone is picked up. It is a plate, lying on a rubber wheel, that changes its height, based on the weight of the object placed on top. The color sensor detects these changes and rings the alarm. With some fine tuning, this robot can even act as a weighing machine.
Collect the humans and clear them from the rocket launching region. This is rather straightforward as a task, but it requires a little bit of thinking if you want to do it without manipulators.
Probably the largest multi-purpose FLL attachment at FLLCasts. These attached is doing a number of missions at once. 4 of them. You attach it to the robot and start the program. The robot moves and accomplishes a number of missions using only this attachment. At it also has a lot of parts. It is quite large and you can not build it from a single set. But that's ok because you are preparing for a competition, right?
Building instructions for the second module of the Ugbroid robot - the Base.
Take a motorcycle and start removing parts. You get a chopper. Like this one. It is built with LEGO Mindstorms EV3. It has one large and one medium motor. It could kind of turn, but moving forward with it is very funny. There is a "more sports like version" available at Ninja - Sports Motorcycle built with LEGO Mindstorms EV3
Currently, the motorcycle has no sensors. It's more of an exercise in construction, but if you attach sensors and think of a way to attach them send us a picture.
Join the course A robot a "day" keeps the questions awake where we will further discuss the motorcycles, how to build them and what tasks to accomplish with them.
After we take each sample, we perform calculations and these calculations could take different time. It is important to know how much time does it take to perform the calculations. In this video tutorial, we would data log the time and plot the data.
Following the Advance Sensor Calibration course section, we found the min and max values detected by each sensor. Now it is time for the real deal of the calibration. Detect the current value from the sensor and find what is the percentage of this value for the range between min and max.
Many times we just upload blocks and leave it up to you to use it. In this tutorial, I would like to show you how to use the implemented blocks. How to import them into the EV3-G software. How to see them in the palette. How to drag and drop them to build a working program.
"What is the light in the room?" - should it even matter. You can use one program for all lighting conditions by calibrating the color/light sensor of the LEGO Mindstorms EV3/NXT robots.
We've already build a number of resources for lifting at FLLCasts.com. But at the end of this course we would have a robot that lifts itself and hangs on the mission model.
In this second video lesson on catapults we improve the stability of the base of the robot. An important feature of the new base is that it is not bending. Use the same principle in all of your constructions to achieve better, stronger robots.
There are many loops in the FIRST LEGO League competition. In this video we collect some of them by following the idea of the ELM team.
In this episode we do a full run of the mission for collecting a single treasure before going into explanation on how we have programmed the robot.
The task is to find what the best seed is that will live the longest without entering into a loop or without dying. Find it and submit in the tasks section.
The Department of "throwing" is ruled by rubber bands. Impulsive power release in a short amount of time. In this video we are building an attachment that throws a ball and accomplishes the FIRST LEGO League 2012 bowling competition.