

Как да използваме началното блокче за сензор за цвят в LEGO SPIKE Prime Word Blocks софтуер
Ето един начин за програмиране с помощта на цветен сензор!
- #2313
- 30 Jul 2024
There are common patterns when working with LEGO Mindstorms Sensors that could be applied to Sound, Rotation, Gyro, Color and all the other sensors.
LEGO Mindstorms EV3 and NXT include many sensors. Use of the sensors is what makes the robot powerfull.
Ето един начин за програмиране с помощта на цветен сензор!

Какво е цвят? Как нашият робот го вижда? Научете това тук!

Чудили ли сте се дали вашият робот може да взема решения? Ето как можем да го направим!

Чудили ли сте се дали вашият робот може да взема решения? Ето как можем да го направим!

Това е един от първите сензорни блокове, които ще научите! Ето как го използваме!

Вече знаете как работи сензорът за разстояние! Но как да го използваме?

Как сензорът за разстояние измерва разстоянието? Сега ще разберете!

Искало ли ви е някога вашият робот да върши две неща едновременно? Това се нарича паралелна нишка и сега ще научите как да направите това в софтуера на SPIKE Prime.

In this video tutorial we accomplish the FIRST LEGO League 2022-2023 SUPER POWERED mission called M04 Solar Farm. We use the chain monster box robot along with a passive attachment that helps us collect 3 of the energy units. The interesting thing about the mission is the collection of the units, of course, but also the way this robot manoeuvres when there is not enough space. It aligns to the lines, it uses the color and motion sensors. Really advance way to align the robot.

In this video tutorial, we accomplish a FIRST LEGO League mission called The Bridge. We demonstrate how to use a really simple active attachment where the goal of the mission is to push down both parts of the bridge. We do not enter into the programming and we leave it up to you as an exercise.

In this video tutorial, we accomplish the FIRST LEGO League 2021-2022 mission called Platooning Trucks. The goal is to connect the two mission models (trucks) to each other and then connect them both to the bridge. It's quite an interesting mission as it involves three mission models.

In this video tutorial, we demonstrate a configurable attachment used for accomplishing a FIRST LEGO League 2021-2022 Cargo Connect mission called Sorting Center. The mission model has three cargo objects that are placed randomly. The attachment is configured before the run based on the configuration of the cargo objects. This attachment is also very powerful as it aligns and auto-corrects the errors that the robot is making by squaring the robot.

This tutorial explains the use of motion and light/color sensors to accomplish a complex mission split into three parts. It gets into detail about how we keep a straight line with the motion sensor, follow a line with the color sensors, and transition between different parts of the program by aligning and detecting lines with the sensor. The goal is to get to a reliable and consistent behavior of the robot. On top of that, it is configurable, as we've left a few parameters that could be set to configure the behavior for a specific robot, venue, lighting, battery level, and wheels friction.

In this video tutorial, we use the Unload Cargo Ship mission from FIRST LEGO League 2021 Cargo Connect robotics competition to demonstrate how we program the robot to keep a straight line while moving. Do we need that for this mission? Probably not, but we do it either way to demonstrate the solution in a fairly simple mission. The program uses the motion sensor to auto-correct the errors the robot is making while moving.
In this video tutorial, we demonstrate how to gently push an object to accomplish the mission. "Gently" means that we are pushing but not with force. If we push using force, the mission model will fall, and we will not accomplish the mission. We use LEGO Education SPIKE Prime and the Ultrasonic Sensor.

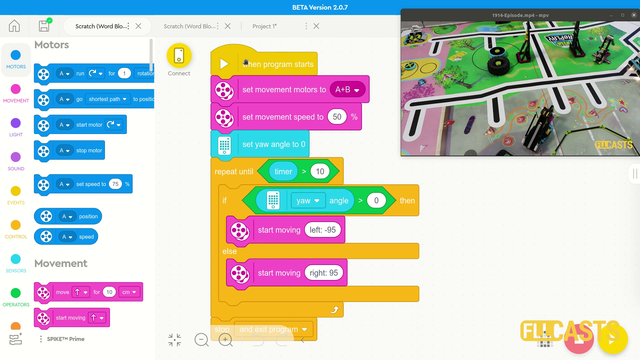
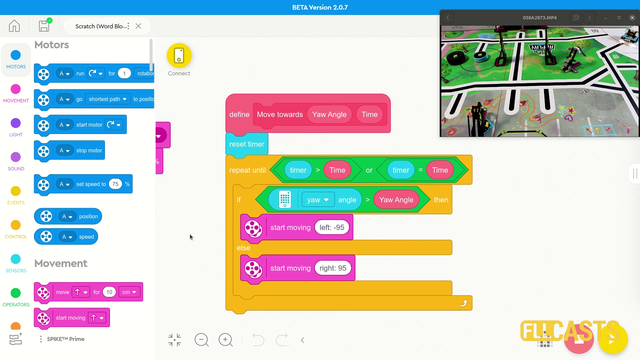
In this video tutorial, we push two of the mission models with a pinless active attachment with gears. The goal is to push the mission models after the blue lines. This attachment is interesting as it demonstrates a non-straightforward idea of how we can push the mission models. We explain the Scratch program and how we use the motion sensors - you will learn how to turn to a specific angle by using the motion sensor.

In this video tutorial we take a next step in programming reliable and consistent robots and this is to learn how to stop at a second intersection. We need this because most of the time when we want to reach a mission model on a robotics competition field, the model will be located away from us and we must use all kind of technique to reach it. In this tutorial - we stop at a second intersection.

In this video tutorial we demonstrate a really important concept for FIRST LEGO League competitions - you position the robot on the field with depending on timers and rotations. The issue with moving the robot for 10 seconds and then stopping is that every time it is in a different location. Same for rotations. The wheels will slip, the battery will change, something will happen and the robot will not be in the same place every time. This is not consistent and reliable.

In this video tutorial we show how you can build robots that position on the field consistently and reliably by following and line and then aligning to a line. We also demonstrate the concept of "double align" which is quite powerful and even if there were some mistakes they will be handled.

This is one of the last tutorials in the LEGO Education SPIKE Prime programming for Competitions course and it demonstrates what we've all been waiting for - how to reach a mission model from base in a reliable and consistent way when the mission model is on the other end of the field. Naturally what we use are all the different concepts that we've learned in the course and the tutorial is more advanced than the other so if anything is not clear take a look also at the different tutorials an concepts in the course.
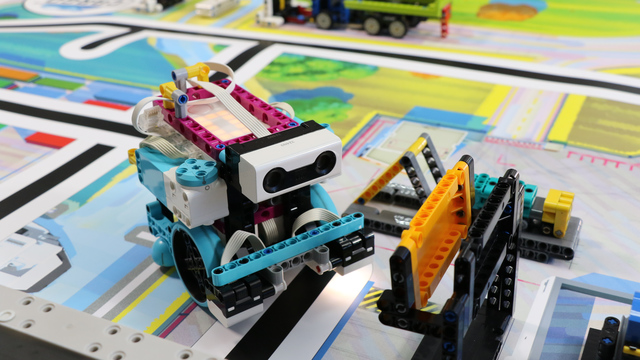
This is the first video tutorial from the LEGO Education SPIKE Prime programming course in which we use a sensor, and we've selected to use the motion sensor. The Motion sensor allows us to detect how the robot turns in a 3-dimensional space-time continuum, or, to put it simply, we use it to move straight with the robot. That's it. We want to move straight - we use a sensor, and the Motion Sensor is a good choice.

Ето един от начините да програмираме със сензор за сила!

On the topic of following lines with a robot there is a way to make the robot follow the line a little more precisely. This method is called "Multi-states" program. Or at least we call it like this. In this tutorial you will see how we program 5 state for the robot line following program. This could be particularly important with FIRST LEGO League competitions where we must build consistent and reliable robots.

In this video tutorial we demonstrate the classic algorithm for following a line with robots. It is widely used in FIRST LEGO League competition and could be applied to LEGO Education SPIKE Prime and to other robots also. The algorithm follows a line by moving to the left and to the right and trying to stay at the edge of a black line.
In this video tutorial we use the LEGO Education SPIKE Prime Motion Sensor to reach a mission model on the field. It's a basic use of the motion sensor that we will extend in the next few tutorials and in the same time we take the opportunity to demonstrate what a MyBlock is and how to develop one. As a result of this video you will learn how to make the program easier to read and maintain by organizing the blocks in the program in special MyBlocks that couple them all together.

Is it better to do fast turns or slow turns? Should you save some time by turning fast or should you be more precise by turning slow. Where is the balance? This video tutorial demonstrates exactly this for LEGO Education SPIKE Prime robot, their motion sensor and an ever occurring question on FIRST LEGO League competition which is how to find the balance and where is the balance.
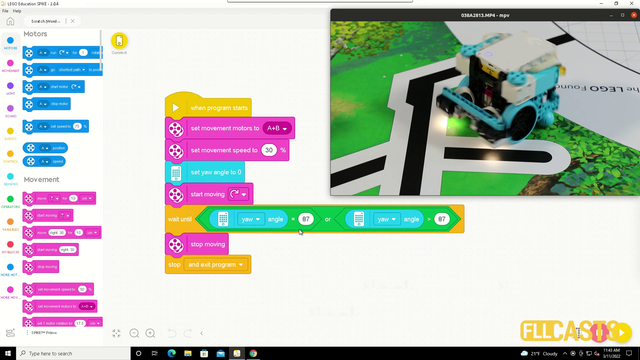
In this video tutorial we demonstrate the use of the motion sensor and how it could be use to turn precisely to 90 degrees. We demonstrate some of the caveats of the sensor and how sometimes it does not work as expected. Like you set the robot to turn until the sensors detects 90 degrees and at the end the robot is not at exactly 90 degrees.