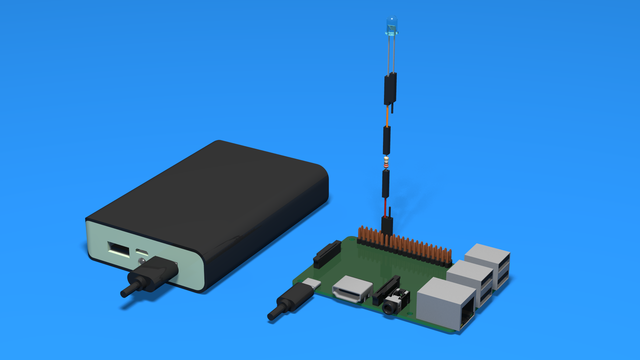
How to Add a diode to indicate controller power up - 3D Scheme
3D Instructions on how to add a diode to the Raspberry Pi and indicate when the Raspberry Pi is turned on.
- #502
- 10 Apr 2018
3D Instructions on how to add a diode to the Raspberry Pi and indicate when the Raspberry Pi is turned on.
We love tanks. You love tanks. Everybody loves tanks. Well, not exactly - more like everybody loves machines with chain treads because they are interesting, not that common, very easy to build and could tackle a lot of obstacles.

Introduction to robotics - The first level of the Robotics with LEGO curriculum for students in second, third or fourth grades. A journey in space, with robots. Various constructions with robots are built. Learn how to control the motors so that the robot navigates around the Sun, the Moon and Earth in various ways. Getting to know the first of the sensors. The robot can feel its surroundings with the help of the Touch sensor and avoid obstacles.


Your first task is coming up! Let’s see how tasks work and how to complete them.
In this course, you will work with videos and tasks.
Videos are marked with the  icon. They will show you how to use your robots and guide you step by step.
After every few videos, you will complete a task to practice what you have learned. The best way to learn is by building, testing, and trying your own ideas.
Tasks are marked with the labyrinth  icon and include clear steps to follow.
These steps break the problem into smaller parts that are easier to solve. Follow them carefully.
When you start a task in class, click the "Started" button below it.
When you finish all the steps, click the "Completed" button to mark the task as done.
If you have difficulty with any step, ask your teacher for help. You can also write your question in the comments section.
You can upload an image to show that you have completed a task. Some tasks require an image, while for others it is optional.

Building instructions for a LEGO Truck. The robot is presented as an Ammo Truck but it can be used for transporting various other objects, too. The construction has a rear drive with each of the rear wheels driven by a Large Lego Motor. The front wheels steer using a Medium Lego Motor. The Brick is placed at the front of the construction which gives the opportunity to easily attach different sensors, based on the task.

Probably the largest multi-purpose FLL attachment at FLLCasts. These attached is doing a number of missions at once. 4 of them. You attach it to the robot and start the program. The robot moves and accomplishes a number of missions using only this attachment. At it also has a lot of parts. It is quite large and you can not build it from a single set. But that's ok because you are preparing for a competition, right?

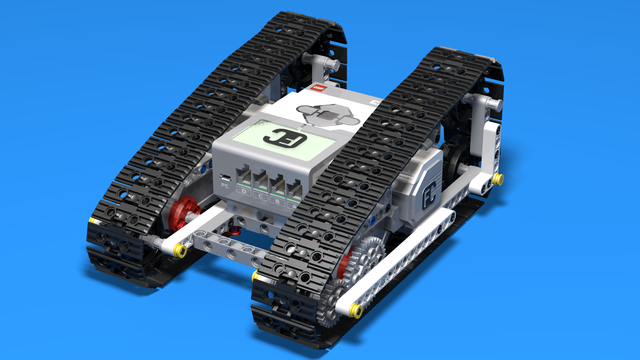
Building instructions for a simple chain tread machine. The robot is actually a simplified version of the Freedom Folk Race tank. All of the ultrasonic sensors are stripped away and the robot can be used for multiple different tasks. The construction is appealing to students and simple enough to be included in a class.

Building instructions for the LEGO Mindstorms EV3 Catapult. The robot has a motor, a clutch to control it for manual shooting and a touch sensor for automatic loading. The bottom base is removed which means the Catapult could not be turned around. Nevertheless, the baseless robot is small enough to be built in class.

Here is another great example of a large multi-purpose attachment used in FIRST LEGO League competitions. This one is specifically for the 2017-2018 Hydrodynamics competitions and is doing a number of missions. (01) Pipe removal, (06) Water Treatment and (08) Manhole cover.
The attachment consists of two parts. The first part is placed on the robot while the second part is in front of the robot and the robot pushes it. While working on the field the robot leaves the second part on the Water Treatment plant and when returning back collects it back and returns to base.
The goal of the attachment is for you to build it and experiment with it with the existing field. Use Box Robot 2 as a robot base on which to add the attachments.

A clutch is a mechanical device that is used for engaging or disengaging power transmission. Now we will see how we can make such a device using LEGO.

In this course, we would like to introduce you to multi-purpose attachments. These are attachments designed to accomplish a number of missions when the robot goes out of the base in the FIRST LEGO League competitions.
You've all seen them. They are kind of large, powered by a few motors and sometimes use rubber bands, levers and other mechanisms.
Use the course as a preseason preparation and try to solve the tasks to prepare for next year competition. Even if you don't have the field, build the attachments and follow the tasks to inspect their behaviour. Modify them as needed when said.
This is the first draft of the course including only the attachments in different sections. If you are interested in learning more please enrol in the course and in the next few weeks we would try to record the video tutorials.

The goal of these building instructions is to build a simple LEGO Mindstorms EV3 robot without wheels. You should then think of yourself how exactly to add the wheel. Which wheels would you use on the front? How are you going to build the third wheel? Here are for example a few recommendations on building the third wheel - 1, 2, 3, 4
Later on you can expland this construction with a grabber as demosntrated here.

Using the On for degrees (rotations) option of the the Medium Motor Move Block you program the motor to rotate for the given number of degrees. However, sometimes is useful to program the motor to go to a given position, instead. To achieve that you can use this block. It takes the start position of the motor as 0 degrees. Then when you run the block with given number of degrees it just rotates the motor to that position. For exaple if your current position is -20 degrees and you run the block with 30 degrees, the motor will rotate for 50 degrees. But if your current position is 10 degrees the same program will rotate the motor for 20 degrees.

Proportional implementation for keeping the LEGO Mindstorms robot straight. The program will take the value of the Mindstorms Gyro sensor and will apply this value to the steering block. This will make the robot steer in a direction that would put the robot in a straight position again.

The experiment contains a plot of the Curren Power of Motors B and C and the values of the Gyro Sensor when the robot is moving with a power of 100%. What you could see is that it is not actually moving with a power of 100% because the current power is about 75-80%.

The block has the following parameters from left to right:

The block has the following parameters from left to right:

This is a program for communicating with LEGO Mindstorms Bluetooth between two bricks. The goal of the program is to control one of the bricks with another brick. The controller has two touch sensors that control the direction and two buttons on the brick itself that control the power.
The control brick has two motors attached that are controlled.
The goal of this program is to be used as an example of how to use the EV3-G Bluetooth. Yes, it requires two bricks, but most of the schools have two bricks and could test the program.

As the name indicates, ultrasonic sensors measure distance by using ultrasonic waves. One of the “eyes” on the sensor head is the transmitter and emits an ultrasonic wave and the other “eye” is the receiver which receives the wave reflected back from the target.

Part of the Perfect STEM course, you should have a Raspberry Pi and an LED connected on GPIO 18 for this example to work.
