How to change the direction of a beam from horizontal to vertical.
- #483
- 11 Apr 2017
- 3:47
- LEGO MINDSTORMS, LEGO Education SPIKE Prime, LEGO MINDSTORMS EV3
- EV3, Construction, Classes with students
The useful parts

You can use the L-shaped beams, as they come in bigger and smaller size.
You could use the double angular beam which we usually use to connect the motors.
You could use the T-shaped black beam.
Use two pins again

For some of the angular beams you should use the axle pin, the one that combines an axle part and a pin part.
The beams that have cross openings are the small L-shaped beam and the double angular beam.

English
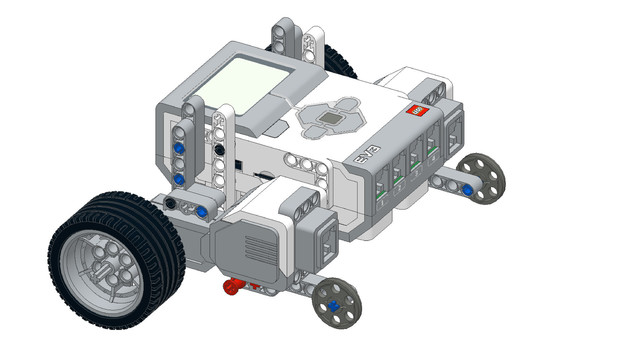
Sometimes you need to extend the construction but not only horizontally but also vertically. And in this video we'll stop at some of the parts and the principles for extending the construction vertically. As an example we'll use this touch sensor. And the goal is to place this touch sensor at the front of the robot but pointing vertically up. What I'll do is take a beam, 2 pins and as you might remember from the previous video from the course we don't add the pins next to each other. We leave at least one hole between them and we have the 2 pins with the beam pointing forward. Our goal is to have the touch sensor in this position. So, we must change the direction. You can see that the direction of this whole construction - the beam is horizontal, now we must change it to vertical. And we can use a number of different parts. We have these L-shaped beams. This one is 3x5 and this one is 2x4 holes. We have the double angular beam and we can all use them to change the direction. How could we do this? First, I'll take the L-shaped beam, add 2 black pins, place here and now using the long blue pin we can attach the sensor.
Like this. And as a result we've changed the direction of our construction. Our sensor is pointing up. We can also use other parts. For example, we can use this double angular white beam and it will serve again the same purpose. The only difference is that here we should place an axle pin, a blue axle pin and one black pin,
attach and in the same way attach the touch sensor.
Like this. We can stack these solutions and we can now change the direction. We can change the direction again to horizontal using this L-shaped beam but this one is 2x4. I'll use a blue pin - long blue pin and one of the black pins. Now, because this is 2x4 and here we have only 2 holes what happens is that there isn't a whole in between these 2 holes to leave space so we are kind of like bound by the construction by the decision of the maker of these Lego parts to have these 2 pins next to each other. Then we add them right here and one more long blue pin and we add the sensor. And now we have a horizontal construction, a vertical construction and then a horizontal again. And we've changed the direction twice - first vertically and then horizontally.
Courses and lessons with this Tutorial
This Tutorial is used in the following courses and lessons
EV3 Phi. Introduction to robotics with LEGO Mindstorms
The things that you will be able to do with your EV3 robot by the end of this course are:
Freely move your robot towards desired target;
Avoid obstacles on the path of your robot using sensors;
Follow lines of any shape;
Detecting and picking up objects of any kind;
- 92
- 220:20
- 36

Extending without instructions. Basic principles
Tips and common mistakes when connecting two beams together
- 4
- 0
- 0
- 3d_rotation 0

Robotics with LEGO - Level 1.0 - Adventure in Space
The first level of the Robotics with LEGO curriculum for students in fifth to twelfth grades.
Various constructions with robots are built. Learn how to control the motors so that the robot navigates around the Moon and Earth in various ways. Getting to know the first two sensors. The robot can feel its surroundings with the help of the Touch sensor and avoid obstacles.
The Ultrasonic distance sensor can help the robot avoid obstacles. Students work with concepts like loop, degrees and medium motor. Robots can now do two different actions at the same time - while solving missions on a field, the third motor clears detected obstacles.
- 126
- 123:52
- 150
Lesson 3 - Clearing the landing zone
Intro
Today we are building a robot, what would automatically clear the landing site.
Before a space craft lands on the moon, you send a robot to clear the landing site. Your robot has landed on the Moon and its task is to clear the site and to prepare it for the landing of the bigger space ship.
The robot lands slightly further away from the site and it must find its way to it. Regretably it road is blocked by rocks that can not be moved. The robot must go around them.

- 9
- 4
- 2
- 3d_rotation 0
Robotics with LEGO - Level 1.0 - Adventure in Space
The first level of the Robotics with LEGO curriculum for students in fifth to twelfth grades.
Various constructions with robots are built. Learn how to control the motors so that the robot navigates around the Moon and Earth in various ways. Getting to know the first two sensors. The robot can feel its surroundings with the help of the Touch sensor and avoid obstacles.
The Ultrasonic distance sensor can help the robot avoid obstacles. Students work with concepts like loop, degrees and medium motor. Robots can now do two different actions at the same time - while solving missions on a field, the third motor clears detected obstacles.
- 126
- 123:52
- 150
Additional tasks to make a real photo of the far side of the moon
Let's put everything that we have learned so far into practice. Let's make a spy robot!
- 3
- 0
- 6
- 3d_rotation 0
Robotics with LEGO - Level 2.0 - Robots in Factories
The third level of the Robotics with LEGO curriculum for students from fifth to twelfth grades.
Robots in this level use two or three sensors at a time and students create more complex programs for them. The work of the differential and its usage in vehicles with one drive motor is explored. Robots interact with each other and transfer information or material between themselves. Students learn in depth how to create smoother line-following programs. In the end of the workday, robots leave the conveyor belt and relax with a recreational game of volleyball.
- 44
- 15:01
- 129
Python with LEGO Mindstorms EV3 - Level 2
In the second level of Python for EV3 robots, students learn in-depth the touch sensor. The sensor is used as an input device for manual control of machines, as well as a sensor for autonomous robots. In a pair of lessons, students build a control panel for the grabber and the movement of a crane. Programming wise, students learn how to fork code with "if-else" constructions, how to create conditional and forever loops with "while" and how to negate conditions with "not" operator. In the end of the lesson, robots can detect obstacles and avoid them, so that they traverse a simple labyrinth.
- 39
- 19:58
- 93

Level A1. Introduction. Robotics with LEGO
Introduction to robotics - The first level of the Robotics with LEGO curriculum for students in second, third or fourth grades. A journey in space, with robots. Various constructions with robots are built. Learn how to control the motors so that the robot navigates around the Sun, the Moon and Earth in various ways. Getting to know the first of the sensors. The robot can feel its surroundings with the help of the Touch sensor and avoid obstacles.
- 142
- 133:42
- 187

Lesson 5 - Clearing a landing spot
Remember to provide feedback to students regularly. It's important to give structured feedback in the form of a grade. Today, you'll need to grade your students following this article.
- 11
- 3
- 5
- 3d_rotation 0

Level A1 - Space Adventure - Robotics with LEGO SPIKE Prime
This is the first level of the LEGO Robotics Curriculum for second, third, and fourth-grade students.
A "space adventure" but with robots. Different robot structures are built in Level A1. The motors are controlled so that the robots perform precise movements around the "Earth", "Moon" and "Sun". We use the force sensor to overcome various obstacles we bump into. We learn interesting facts about the solar system and space vehicles.
- 65
- 30:30
- 76

Lesson 5 - Clearing the landing pad
Remember to provide feedback to students regularly. It's important to give structured feedback in the form of a grade. Today, you'll need to grade your students following this article.
- 7
- 4
- 12
- 3d_rotation 2
Level A1. Introduction. Robotics with LEGO
Introduction to robotics - The first level of the Robotics with LEGO curriculum for students in second, third or fourth grades. A journey in space, with robots. Various constructions with robots are built. Learn how to control the motors so that the robot navigates around the Sun, the Moon and Earth in various ways. Getting to know the first of the sensors. The robot can feel its surroundings with the help of the Touch sensor and avoid obstacles.
- 142
- 133:42
- 187
Lesson 4 - Lap around the Moon
Introduction
Today the robot we are building is a spaceship once again. The aim for today, however, is exact - to reach the further (dark) side of the moon!
Where is located the dark side? Why is it so hard to be reached? Why is it called "dark"?
- 13
- 4
- 5
- 3d_rotation 1