What is allowed and what is not when building without instructions.
- #432
- 03 May 2017
- 2:59
- LEGO MINDSTORMS, LEGO MINDSTORMS EV3
- Teacher's Note, Methodology, EV3, Construction, Classes with students
Use beams
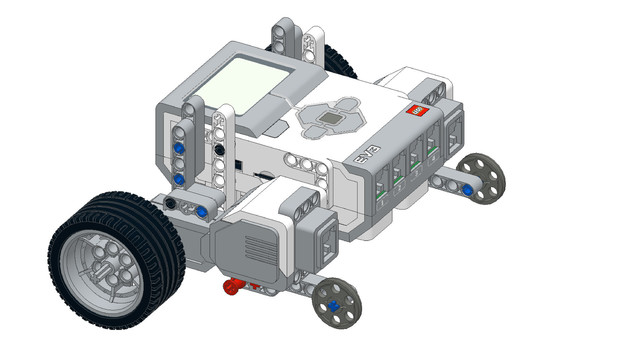
Students tend to use axles when they build. Show them an alternative, show them how to build with beams.
Positioning of the sensor
Let the students build any way the like. The sensor may be placed anywhere on the robot, as long as it is pointing forward and it is outside of the frame of the robot.
English
A few notes for the teacher on how based on our experience of course most of the students will add this sensor to the front of the robot. Few things to note here. First, when they have this task most of the students will try to extend the construction with axles either with a gray one or a black one because it's easy to do this with an axle but a more durable way is to use beams. Don't stop them but just have in mind that the students that are starting with an axle will probably at the end have a construction not that durable or it will take them more time to add the touch sensor to the front of the robot. The other thing is that you can add the sensors at different places at the front of the robot. You can even for the next few sessions, for the next few videos you can even add the sensor at the top of the robot. Now, it's preferable if you don't stop the students if the decide to add the sensor at a different position even on the top of the robot. Why? Because that's a part of their imagination and they'll try, they'll come up with different solutions and it's interesting then to discuss this solution. But as a general rule the touch sensor should not be inside the frame of the robot because the idea of the touch sensor is that when you move it can actually touch things at the front. And if the sensor is inside the frame of the robot, it will be the robot first bumping at the wall and the sensor will not be able to bump. If of course you do not extend the sensor but that's a topic for some of the next videos. Probably the most difficult thing that the student will have to solve now, the most difficult task is how to change the direction of the holes of the different beams. So, in this case you can think of the beam as facing up and how do you using some of the parts in the set change this direction with a couple of other beams so that at the end it will face left or right. So, it's horizontal instead of vertical. And this will be something difficult for most of the students but at the end in about 10-15 minutes probably they'll come up with a solution. If you have a student that have accomplished this in a very short time, you can give them a more complex task to make this longer or to make this higher so that they could keep up with the rest of the group.
Courses and lessons with this Tutorial
This Tutorial is used in the following courses and lessons
EV3 Phi. Introduction to robotics with LEGO Mindstorms
The things that you will be able to do with your EV3 robot by the end of this course are:
Freely move your robot towards desired target;
Avoid obstacles on the path of your robot using sensors;
Follow lines of any shape;
Detecting and picking up objects of any kind;
- 92
- 220:20
- 36

Extend the robot with a touch sensor. Building without instructions
Try to add a touch sensor to the robot on your own.
- 2
- 0
- 1
- 3d_rotation 0

Level A1. Introduction. Robotics with LEGO
Introduction to robotics - The first level of the Robotics with LEGO curriculum for students in second, third or fourth grades. A journey in space, with robots. Various constructions with robots are built. Learn how to control the motors so that the robot navigates around the Sun, the Moon and Earth in various ways. Getting to know the first of the sensors. The robot can feel its surroundings with the help of the Touch sensor and avoid obstacles.
- 142
- 133:42
- 187

Lesson 6 - Touch sensor
In the next lesson we usually do a graduation. Write down your impressions about the students and the reasons why they have the grades you gave them.
- 10
- 3
- 6
- 3d_rotation 0

Robotics with LEGO - Level 1.0 - Adventure in Space
The first level of the Robotics with LEGO curriculum for students in fifth to twelfth grades.
Various constructions with robots are built. Learn how to control the motors so that the robot navigates around the Moon and Earth in various ways. Getting to know the first two sensors. The robot can feel its surroundings with the help of the Touch sensor and avoid obstacles.
The Ultrasonic distance sensor can help the robot avoid obstacles. Students work with concepts like loop, degrees and medium motor. Robots can now do two different actions at the same time - while solving missions on a field, the third motor clears detected obstacles.
- 126
- 123:52
- 150

Python with LEGO Mindstorms EV3 - Level 2
In the second level of Python for EV3 robots, students learn in-depth the touch sensor. The sensor is used as an input device for manual control of machines, as well as a sensor for autonomous robots. In a pair of lessons, students build a control panel for the grabber and the movement of a crane. Programming wise, students learn how to fork code with "if-else" constructions, how to create conditional and forever loops with "while" and how to negate conditions with "not" operator. In the end of the lesson, robots can detect obstacles and avoid them, so that they traverse a simple labyrinth.
- 39
- 19:58
- 93

Lesson 6 - Automated vacuum cleaner
Introduction
Today we will create a robot that will behave like an automated vacuum cleaner!
One of the most annoying household chores an adult could have is cleaning their home. Which is why engineers invented the Roomba! And we're not talking about the dance, but rather a robotized home vacuum cleaner.

- 5
- 4
- 8
- 3d_rotation 1
Python with LEGO Mindstorms EV3 - Level 2
In the second level of Python for EV3 robots, students learn in-depth the touch sensor. The sensor is used as an input device for manual control of machines, as well as a sensor for autonomous robots. In a pair of lessons, students build a control panel for the grabber and the movement of a crane. Programming wise, students learn how to fork code with "if-else" constructions, how to create conditional and forever loops with "while" and how to negate conditions with "not" operator. In the end of the lesson, robots can detect obstacles and avoid them, so that they traverse a simple labyrinth.
- 39
- 19:58
- 93

Lesson 7 - Passing through a tunnel
For students who will not take two levels in a row today is their last lesson.
- 10
- 3
- 8
- 3d_rotation 1