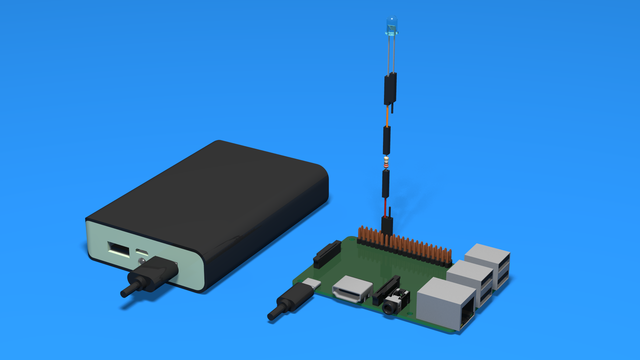
How to Add a diode to indicate controller power up - 3D Scheme
3D Instructions on how to add a diode to the Raspberry Pi and indicate when the Raspberry Pi is turned on.
- #502
- 10 Apr 2018
3D Instructions on how to add a diode to the Raspberry Pi and indicate when the Raspberry Pi is turned on.

In this 3D scheme, you can see how the motor driver is connected to the Raspberry Pi and to the motor. Follow the steps in the instructions one by one and you will have successfully connected the motor to the Raspberry PI

3D scheme on how to connect the L298N Motor Driver to the Batteries. Follow the step-by-step instructions. Be careful about the PCB terminal connectors.

3D scheme with instructions on how to connect the L298N driver to the batteries and to the motor. Just that. Connecting to the Raspberry Pi is at a later stage of the course.

A 3D scheme on how to connect the front steering motor to the Raspberry PI. This includes the Motor Driver and the batteries. The rear motor is also on this scene.

Building instructions for the LEGO Mindstorms EV3 Catapult. The robot has a motor, a clutch to control it for manual shooting and a touch sensor for automatic loading. The bottom base is removed which means the Catapult could not be turned around. Nevertheless, the baseless robot is small enough to be built in class.
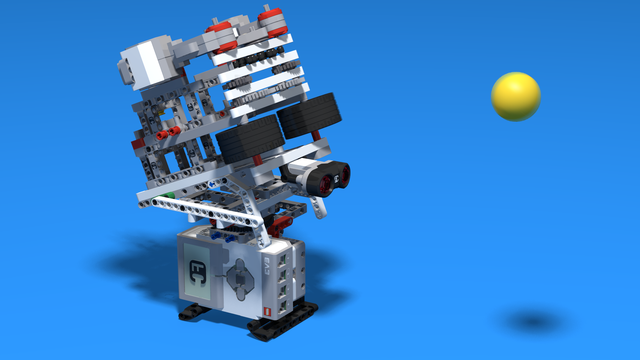
Building instructions for a LEGO robot that shoots 40 mm ping pong balls. The shooting mechanism is powered by two EV3 Large motors, while the whole mechanism is rotated by a medium motor. The robot can store up to 6 ping pong balls and has a Ultrasonic Sensor to detect targets.

The goal of these building instructions is to build a simple LEGO Mindstorms EV3 robot without wheels. You should then think of yourself how exactly to add the wheel. Which wheels would you use on the front? How are you going to build the third wheel? Here are for example a few recommendations on building the third wheel - 1, 2, 3, 4
Later on you can expland this construction with a grabber as demosntrated here.

Using the On for degrees (rotations) option of the the Medium Motor Move Block you program the motor to rotate for the given number of degrees. However, sometimes is useful to program the motor to go to a given position, instead. To achieve that you can use this block. It takes the start position of the motor as 0 degrees. Then when you run the block with given number of degrees it just rotates the motor to that position. For exaple if your current position is -20 degrees and you run the block with 30 degrees, the motor will rotate for 50 degrees. But if your current position is 10 degrees the same program will rotate the motor for 20 degrees.

This is an EV3-G block for displaying the values of array cells in an EV3-G program.
The project contains two programs, which are demos of the blocks for displaying Boolean and numeric arrays.
You can import that blocks in your programs. They are designed to show you in real time what are the values in your array and let you go to the next bit of your program. The blocks operate with the UP and DOWN brick buttons to iterate through the array. And the CENTER brick button to advance to the program.
The blocks are very useful for students to show them in real time what values they have stored in their arrays. Because there is no easy way to see real-time what the values are in the array even if it contains only a few elements.
The block shows you how many elements there are in the arrays and the values in the following way:


This is a program for communicating with LEGO Mindstorms Bluetooth between two bricks. The goal of the program is to control one of the bricks with another brick. The controller has two touch sensors that control the direction and two buttons on the brick itself that control the power.
The control brick has two motors attached that are controlled.
The goal of this program is to be used as an example of how to use the EV3-G Bluetooth. Yes, it requires two bricks, but most of the schools have two bricks and could test the program.


As the name indicates, ultrasonic sensors measure distance by using ultrasonic waves. One of the “eyes” on the sensor head is the transmitter and emits an ultrasonic wave and the other “eye” is the receiver which receives the wave reflected back from the target.

A LEGO door with a touch sensor that knows when it's open. It has a stopper and even makes the familiar noise of a creaky door. You can use it by its own or put it in a model of a house.

A nice little robot that can tell if there is anything on top of it. It only uses one touch sensor. The idea of the robot is to be used in classes with students to explore different interesting security options. This robot in particular could detect when the object placed on it gets "stollen". Have you ever watched Indiana Jones? :)
Embark on a daily robotics adventure with A Robot a Day Keeps the Questions Awake (Version 2.0). This course is designed to ignite curiosity and foster independent learning in students, offering a structured yet flexible approach to exploring robotics at home.
The course is tailored for self-guided learning, requiring minimal parental assistance, making it ideal for students to progress at their own pace. Whether you're a beginner or looking to sharpen your skills, this course offers a comprehensive and enjoyable pathway into the world of robotics.

Mantissa, a LEGO Mindstorms Robot, moves and attacks. It uses the ultrasonic sensor and it's two special hands. Follow the building instructions and download the prepared program to directly use the robot.

Do you have a friend for a sleepover? This might be the perfect robot for you! It is a football gate, guarded by Fint, the goalkeeper robot. You can control him, by using the remote controller, that consists of two Touch Sensors. Take turns making penalty shots and have a blast with this awesome robot!
What we recommend:

Cápa means shark in Hungarian.
The robot resembles a live hammershark. It uses a medium motor to move its tail, which is used for the shark to turn. It moves forward with a large motor and two tyres. Its jaws open and close with a second large motor. The two touch sensors at the front are purely for aesthetics but you can use them if you like. Finally the head has an ultrasonic sensor which detects if something is a potential "prey". This resembles the real hammer sharks' ability to sense with their "hammer".

This robot is a spin-off of the Useless machine built from LEGO Mindstorms EV3. This robots mission is to be the last to press the button it holds.

Become the best remote control driver at VEX IQ competitions. Test your skills in a number of challenges now. Pass them successfully and become a "Class R1" driver.
The goal of "FLLCasts Certified VEX Driver - Class R1" is to certify your abilities to remotely control a VEX IQ robot. Everything is prepared for you. The course book contains a robot to build, remote control program to download and challenges to complete. If you complete each challenge below a certain time, and prove it, you will receive the "FLLCasts Certified VEX Driver - Class R1" certificate.
Find the Complete Guide at VEX IQ Robotics Competition
The first level of the course book is currently available for a free as it is in a Pre-release.
