

Every program is comprised of a series of instructions
Let's make a program that moves the robot forward and then backward.
- #378
- 04 Feb 2017
Let's make a program that moves the robot forward and then backward.

With this 10 runs we demonstrate the consistency and reliability that could be achieved with a LEGO Education SPIKE Prime robot and a 2-states simple line following algorithm. It is not bad. Still there are some things you should consider when using this program and one of the things is the use of the timers
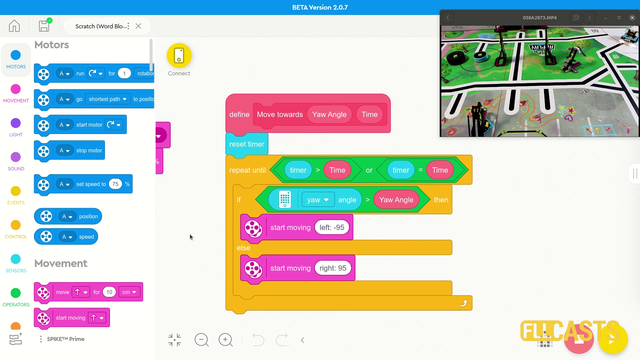
In this video tutorial we use the LEGO Education SPIKE Prime Motion Sensor to reach a mission model on the field. It's a basic use of the motion sensor that we will extend in the next few tutorials and in the same time we take the opportunity to demonstrate what a MyBlock is and how to develop one. As a result of this video you will learn how to make the program easier to read and maintain by organizing the blocks in the program in special MyBlocks that couple them all together.

In episode 11 we looked at one of the most important topics for the competition - calibrating the light sensors. In this video I would like to show you how to use a more programmatic approach. This means letting the robot do the calibration on its own. Automatically.

One of the easiest ways to improve the accuracy of LEGO Education SPIKE Prime robots is to use acceleration and deceleration when moving. This also applies to LEGO Mindstorms EV3 and LEGO Mindstorms Robot Inventor and generally to most robots that we know of. This tutorial demonstrates how acceleration and deceleration could be used and what improvement in accuracy and consistency you could expect. This is quite useful for FIRST LEGO League and other robotics competitions.

You have the controller, you have the diode. The controller has a number of pins (holes). Where should you put the diode so that it starts blinking?
The small holes on the controller are called pins. On our controller we have 32 pins. The more pins that you have, the more elements you can controller with this microcontroller. For this video the interesting pins and 13 and GND

In this episode I will show you how to program the touch sensor part of the LEGO Mindstorms education robotics sets. I have given answers to questions like - how the touch sensor works or how you can use it.

In this video tutorial we start with the basic of the basic, eg. how to move. We use the block from LEGO Education SPIKE Prime Word Blocks software. It is based on Scratch. The goal of the tutorial is to demonstrate how we can move and to teach something very important - the robot moves inaccurately

As an exercise try to implement the calibration of the minimum and maximum values for a single sensor.

On the topic of following lines with a robot there is a way to make the robot follow the line a little more precisely. This method is called "Multi-states" program. Or at least we call it like this. In this tutorial you will see how we program 5 state for the robot line following program. This could be particularly important with FIRST LEGO League competitions where we must build consistent and reliable robots.
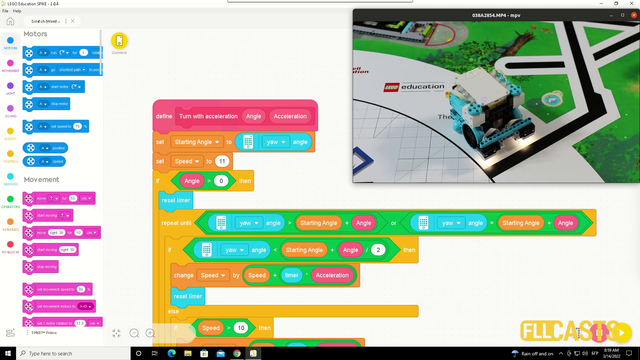
In this video tutorial we explore acceleration and deceleration and how to make the robot turn precisely by using acceleration and deceleration. The goal is for us to demonstrate a program that turns the robot to 90 degree. In the first 45 the robot is accelerating and in the second 45 it is decelerating.

Implement the program for array initialization.
Follow the video tutorials for initializing arrays and implement the program.
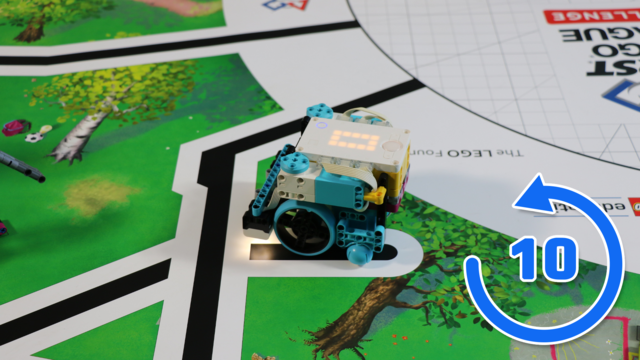
This LEGO Education SPIKE Prime video tutorial demonstrates the difference in turning slow and turning fast and using the Motion sensor to understand the orientation of the robot. We do 10 consecutive runs. The goal is to understand what can you expect from the robot behavior in terms of consistency.

In this tutorial, we connect the Motorola phones to the Tetrix controller using the USB hub.

An interesting question that has arise is whether we can use the LEGO Mindstorms EV3-G Software to program the NXT brick. In this episode we will go through the blocks from the EV3-G Software and see which works with the NXT Hardware and which does not.

Is it better to do fast turns or slow turns? Should you save some time by turning fast or should you be more precise by turning slow. Where is the balance? This video tutorial demonstrates exactly this for LEGO Education SPIKE Prime robot, their motion sensor and an ever occurring question on FIRST LEGO League competition which is how to find the balance and where is the balance.

Following the previous tutorials from the course, implement the calibration of the minimum and maximum values.

An advanced but understandable description of how to program the mindstorm robot to move in a regular n-gon like pentagon, hexagon etc. (Yes, we know math). We have also included notes on the used formulas. A must see for each of you who would like to master the robot movements.

The reason why you would want to watch this tutorial is because it demonstrates one of the most reliable ways to know where you are on the field and to accomplish missions successfully and this is aligning to a line. In the tutorial you will also see how a parallel program is developed and who parallel programs could be used in a meaningful way.

In this video tutorial we will reach a specific location on the field 10 times. This programs demonstrates the accuracy and consistency of a program that used the Motion Sensor to detect the angle at which the robot rotates. At the end of the tutorial you will have a visual and clear picture of what you could expect from this basic usage in terms of consistency and accuracy. This might be enough for some cases and it might not be enough for others.

How to control the arm of the push bot using the two triggers on the GamePad of the FTC Push Bot?
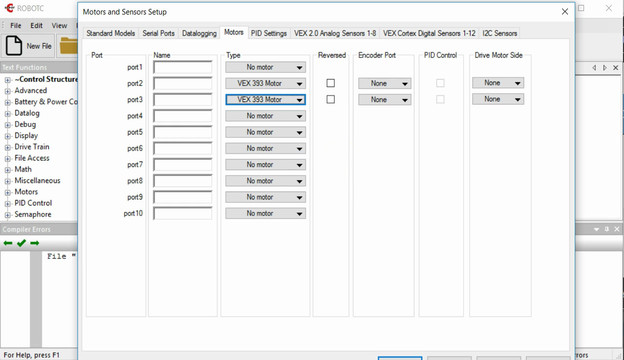
The comunication between the motors and the controller should be configured in the RobotC software. Each motor could be connected on a different port and the goal of the video is to show you how.

The last thing you want to lose during every robotics competition is time for changing the programs on the brick. This could require seconds and as we all know every second counts. There are a few ways to improve the way of choosing programs. In this video lesson we will show you how to program a menu directly in your program.

In this video tutorial we take a next step in programming reliable and consistent robots and this is to learn how to stop at a second intersection. We need this because most of the time when we want to reach a mission model on a robotics competition field, the model will be located away from us and we must use all kind of technique to reach it. In this tutorial - we stop at a second intersection.
Conenct the motors of the VEX EDR motor to the VEX Corted Controller. For connecting we need the motor drivers.

After we've download the software we must install it and most importantly configure it. Without propertly configuring the software it would be difficult to use the Cortex Controller.

There are basically three type of generations in the robotics game of life.