In this video tutorial, we accomplish a FIRST LEGO League 2024-2025 mission. First, it's the Coral Nursery. And for the Coral Nursery, we must somehow activate this lever to put the coral buds, they are called buds, up. So this is the first part of the mission. We accomplish a second mission where, where we take this Scuba diver and we have to remove it from the coral nursery and put it on the coral reef. And one of the final parts of the mission that we are trying to accomplish is the Shark. And then on the Coral Reef, we have to again do something with these buds. We have to activate the mission model so that they are facing up. So it's like 1, 2, 3, 4, 5 things that we are doing in the same mission run with the same robot.
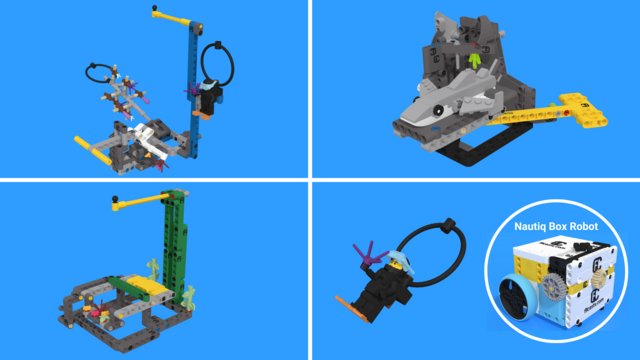
Let's see how it goes. For this mission, we are using an attachment at the front, attachment at the top, and attachment at the back. So, like, three attachments on. On the same robot. And each of these attachments is pinless. We can attach them quite fast, and it's easy to attach and remove and to do it in a fast way. We have active attachments. We also have passive attachments. We'll see how they work. It's just three attachments. Front, back, top.
We start from base. We go for the coral nursery. Push. The buds are up. Push on the shark. Take the scuba diver. Attach the scuba diver. Rotate the robot. The buds are up, and we return back to base. Perfect execution.
It's worth taking a look from a different close up angle. Move. The coral buds are up, and we take the scuba diver. In slow motion. We have this attachment at the front of the robot. We move with the attachment, and by pushing on this yellow axle there, it will rotate the coral buds and it will put them up.
So it can't be just a vertical wall because then it will not work. It should be like, at an angle so that we can push down and then forward. And this will rotate it. It's like a rotation. Quite an interesting mission.
The next mission is the Shark. The shark is in a cave. If the shark is outside of the cave at the end, we receive I think it was like 10 points - 20 points. So it's a mission model where there is a single action. If we push on this lever, it will release the shark.
The interesting thing about this mission is that it's kind of like in the corner. And if we can do something about this mission that we can reuse an already existing attachment, it will be great. So with this attachment at the front of the robot, we are accomplishing the Coral Nursery and the Shark at the same time. Because it's kind of like the same motion that we have to do there. We have to push down, go forward and down. Always try to reuse the attachments for a couple of missions if you can.
A joint mission. We have to collect the scuba diver. And scuba diver initially is on the coral nursery mission model. So it's like collecting a loop. And we have to remove it from the coral nursery and then place it on a different mission model.
The interesting thing here is that it's collecting the loop, but it's also delivering the loop. For this, we have an attachment at the top. And this attachment, it has a small locking mechanism there so that we can lift the scuba diver.
It's also interesting that we can't just lift it up. We have to lift it up and push it a little bit to us. Otherwise it'd be impossible to lift the scuba diver. Very, very difficult and very interesting. Let's see how now we can deliver it to the other mission model. This is the final mission model. From this run, we move and we deliver the scuba diver. Then we rotate quite fast and we activate the second part of this mission model.
Let's go over it, but this time in a slow motion. What exactly are we doing here? The scuba diver at the end must be supported by this yellow axle. So we must somehow deliver it there. It's not only collecting the loop, it's also delivering. We are moving with the robot, and we have attachment at the top of the robot. We move, we activate the attachment. It's an active attachment. And by lowering the scuba diver on the yellow axle, it also unlocks and can move back.
Then as we are there, we just rotate the robot and we have these beams here that are just pushing.
It's interesting that some of the beams are like free, so they can push in the right way for us to have the corals facing up. That's it. Hope it is helpful and I'll see you in the next tutorial.