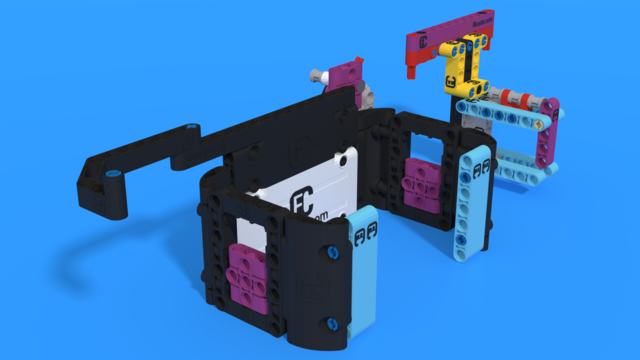
EV3 basics course. Ultrasonic Sensor. Stop & Move (part3)
Stop on detecting an object with the Ultrasonic sensor and move after detecting there is no object. Join of the previous two video tutorials in one
- #144
- 14 Oct 2015
These are all the robot building instructions. By visiting each building instruction you could see the Tutorials and Courses and Lessons in which it is used.
Stop on detecting an object with the Ultrasonic sensor and move after detecting there is no object. Join of the previous two video tutorials in one
In this video tutorial we look at Acceleration and Deceleration with a LEGO Education SPIKE Prime robot. The goal of the tutorial is to demonstrate the accuracy of the robot when we us default acceleration and slow acceleration.
There are many loops in the FIRST LEGO League competition. In this video we collect some of them by following the idea of the ELM team.
Many FLL competitions have a mission for demolition. You should always destroy something, but destroy it in a regulated manner and probably collect the destroyed mission model after that.
Using a number of axles, beams and rubber bands we collect many loops at once. This is an important part of every competition, mostly of the FIRST LEGO League.
We keep the robot orientation straight while moving, but when we stop the robot could be in a different orientation. This applies for both using the Mindstorms Gyro Sensor when moving straight or the Mindstorms Color sensor when following a line. In this video tutorial, we will do a few examples of when an how this could happen.
This is the final run for our World Robotics Olympiad (WRO) 2015 Elementary Challenge Robot. In "dives", detects the color of the pearl and then counts the number of Ping-Pong balls to release.
We've detected the gap. It's time to move over it. This is difficult because we have to detect where the line is after the 0.1 meters gap on the line following field.
Робота Икозейтър е конструиран с идеята да може лесно да се променя зъбната му предавка. На видеото може да наблюдавате един начин за смяна на предавката му, като се извади гредата и се разменят зъбните колела на мотора и верижното колело. За предавки с различен размер зъбни колела се иска промяна в дължината на веригата или броя зъбни колела.
You can collect the car for scrap or repair it. The ELM teams decide to repair it. This requires them to place the engine in the car and it's very interesting to think about this problem.
In this video tutorial we demonstrate the use of the motion sensor and how it could be use to turn precisely to 90 degrees. We demonstrate some of the caveats of the sensor and how sometimes it does not work as expected. Like you set the robot to turn until the sensors detects 90 degrees and at the end the robot is not at exactly 90 degrees.
In the first LEGO tutorial we started following a wall with the Ultrasonic Sensor. In this tutorial we would improve the program, remove the zig zag movement and make it very smooth.
Based on your feedback we have decided to show you the live process of building a complex LEGO Mindstorms Competition robot without having the whole robot ready yet. We would be making mistakes, showing them and taking up the challenges right in front of your eyes. The first construction would not be perfect but we would eventually arive at it.
"What is the light in the room?" - should it even matter. You can use one program for all lighting conditions by calibrating the color/light sensor of the LEGO Mindstorms EV3/NXT robots.
Tasks for school STEM classes or home exersie. Try to solve them to submit your solutions below.
In this tutorial of the series we would get into more details on how the flywheel works, what's its purpose and how the whole attachment is triggered with the first rubber band.
Как да потърсим и намерим неизвестна стойност с възможно най-малко опити.
"The devil is in the details". We are improving the Rubber band attachment with a Flywheel by introducing a few small, but important modifications that make the whole robot attachment more stable and reliable. With the conclusion of the series this attachment could be used as a basis for some very interesting STEM demonstrations on energy accumulation and conservation.
The next step of lifting a robot to a mission model is to try to use a rack.
Raw footage of the mission. Might upload a more polished version soon
Next important state is Turn Right with our robot. This happens when we detect a line on the right.
Tasks for STEM classroom and home exercise to get you used to using the LEGO Mindstorms Touch sensor. Solve them, build a program, record a video and upload your solutions below.
Many teams have followed the same idea as the ELM team. To build a LEGO Mindstorms attachment for the robot and to lift the truck very lightly. In this way they could more the truck and place it in the special region. See what the ELM idea was.
This second part continues with importing two previously developed in Episode 53 blocks into our program. With them we can for align to lines. We program the robot to align to the cross line and start following it.
Every time we start the robot we want to start from the same place, not only in terms of where we are on the field but also in terms of how are the motors rotate. The motors have an internal sensor for detecting the rotation. Because of this they know how rotated they are. It is a very good practice to always reset the motors before we start a competition run especially at FIRST LEGO League or World Robot Olympiad competitions
This video tutorial contains a detailed explanation on how we accomplish the FIRST LEGO League 2018-2019 Into Orbit mission called M09. STRENGTH EXERCISE. I could think for a couple of missions in previous years that require lifting a heavy object. Let's see how this mission could be accomplished.
We've already build a number of resources for lifting at FLLCasts.com. But at the end of this course we would have a robot that lifts itself and hangs on the mission model.