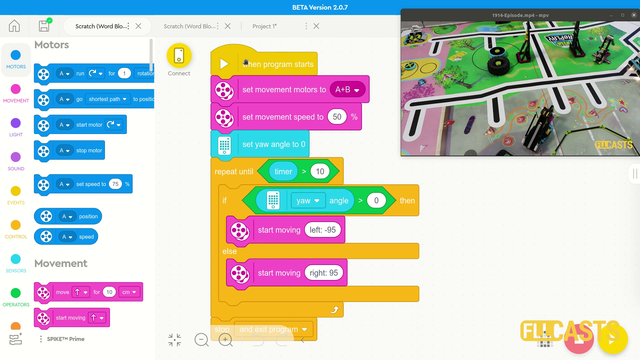
VEX IQ Robot Base Chassis 4 v2
It's the second version of the Robot Base 4, but with rotated inside motor.
- #315
- 15 Jul 2017
It's the second version of the Robot Base 4, but with rotated inside motor.
Showing the same run, but from a different angle. This allows you to see more of the way we sensors work and how exactly the robot positions itself.
This block accurately turns the robot to a specific angle. One of the most useful blocks that you could use during competitions. The block makes the robot turn and when the robot makes an error, the block will correct for this error.
Finally, you can be sure that the robot has turned to the specific angle that you want.
You have three inputs
VERY IMPORTANT: This is a block for EV3-G. You download and import this block from Project Settings->Blocks->Import. If you are using Internet Explorer or Microsoft Edge and you click to download the file it will try to save it as "zip". DO NOT SAVE IT AS ZIP. Save it as "ev3s" or just PLEASE, STOP using Internet Explorer or Microsoft Edge. This will dramatically improve your browsing experience.
In this program, we return the robot to a straight orientation at the end of the program. If there is not enough time for the Mindstorms Gyro sensor the correct the orientation of the robot before the end of the program, then we should do it at the end.
Даденото блокче има следните параметри от ляво на дясно:
ЛЕГО Mindstorms EV3 робот, създаден за състезанието Folk Race. Този робот има три сензора за разстояние. Следвайте инструкциите и ще получите един базов робот с танкови вериги, който може да използвате веднага.
Building instructions for the robot used in WRO 2014. It is a small robot with two light sensors and could be used for collecting elements.
The robot is built from LEGO Mindstorms EV3 parts.
Would you like to resolve all the problems with the light/color sensors that you have? And to make all of them work in a predictable, stable way even when using more than one MINDSTORMS colour sensors.
When using Color sensors it is important to calibrate them depending on the light conditions in your venue. In this way, the calibrated sensor will show values between 0 and 100 independent of the light conditions. But using the default EV3 colour calibration available in the colour sensor block could lead to unpredicted problems that are difficult to track and resolved especially when used with multiple Color sensors. So in this series of tutorial we implement the calibration ourselves discussing the principles of colour sensor calibration.
A common question is how to display arrays on the LEGO Mindstorms EV3 brick screen. Displaying values from an array is not different from any other display operation. In this tutorial, we would look at displaying two specific values. The minimum and the maximum for a specific sensor from the Advance Calibration Course Section
Following the Advanced Sensor Calibration course section, it is time to extract the logic for getting a calibrated value into a new block. This block will have an input and on this input, we give the port number. The block will return the calibrated value for this port number. We've built all the other blocks only because of this almost final video here.
This is the example program using the blocks available at Blocks Package for Advance Calibration of LEGO Mindstorms EV3 Color/Light sensors. The program makes the robot find the minimum and maximum values and to calibrate the current sensor value depending to the min and max.
Big Wheelster, as his name suggests, is a robot with a big wheel! The Big Wheel is made out of the SPIKE Prime Baseplates. The robot also has an interesting steering mechanism! At the front we have added a touch sensor, to detect an obstacle and hopefully avoid it.
This program is developed with Robot Inventor - LEGO MINDSTORMS App Python and is used to make the robot stop at a distance from the border field.
In this short animation we demonstrate how the LEGO Mindstorms Robot Inventor Distance sensors could be attached to the robot and then use to stop at distance from a wall. This wall could be the border of the field or another mission model. We need an attachment, we need a sensor and we need the robot. In the live video in the lesson we enter into more details and explanations of how the sensor is used. Programs for the distance sensor are provided in the lesson and in the LEGO Mindstorms Robot Inventor Programming course we enter into more details about how to program the distance sensor
In this video tutorial we demonstrate the classic algorithm for following a line with robots. It is widely used in FIRST LEGO League competition and could be applied to LEGO Education SPIKE Prime and to other robots also. The algorithm follows a line by moving to the left and to the right and trying to stay at the edge of a black line.
In this program we demonstrate how to program a SPIKE robot to align to а line with the aid of two color sensors while moving backward. Make sure the line is big enough for the sensor to detect it. For this program to work, the sensors must be placed in front of the wheels.
This program was intended for and tested on the Gazon robot
Искало ли ви е някога вашият робот да върши две неща едновременно? Това се нарича паралелна нишка и сега ще научите как да направите това в софтуера на SPIKE Prime.
Това е един от първите сензорни блокове, които ще научите! Ето как го използваме!