
Task - Calibrate more than one sensor with the Advanced Calibration technique
Following the previous tutorials from the course, implement the calibration of the minimum and maximum values.
- #640
- 04 Oct 2017
Following the previous tutorials from the course, implement the calibration of the minimum and maximum values.


Implement a program for stopping at a black line with the blocks containing the implementation details for the InitArray, Calibration and Getting the calibrated result.

Following the Advance Light/Color sensors calibration for a minimum value for a single sensor tutorial, in this one, we continue with finding the maximum value detected by a sensor and storing this value in an array.

A common question is how to display arrays on the LEGO Mindstorms EV3 brick screen. Displaying values from an array is not different from any other display operation. In this tutorial, we would look at displaying two specific values. The minimum and the maximum for a specific sensor from the Advance Calibration Course Section

In this tutorial, we show you how to display all the values from an EV3-G array on the EV3 brick display. We are using an array Read Operation along with a loop. We are also detecting the loop counter and using it as an index to an array. It's basically the only viable way to do it. The process is commonly referred to as - "Iteration over an array" (although we still do not have an iterator in the programming language, we promise that one day we would do the super advance videos on "iteration" using the LEGO MINDSTORMS robots")

One of the smartest things you could do in any software program is to extract logic in small reusable, simple, understandable units. In EV3-G these are called Blocks and we are going to extract the logic for finding a minimum and maximum for each of the sensors in a new block.

Following the Advanced Sensor Calibration course section, it is time to extract the logic for getting a calibrated value into a new block. This block will have an input and on this input, we give the port number. The block will return the calibrated value for this port number. We've built all the other blocks only because of this almost final video here.

Sometimes when we are working with sensors it is important that the time between two consecutive samples is the same. This will make each sample equally important and independent of how much time it took to take it. In this video tutorial, we would use the EV3-G timer block to make a "WaitForTick" program where the time between each sample of the EV3 Gyro takes exactly 0.02 seconds.

After we take each sample, we perform calculations and these calculations could take different time. It is important to know how much time does it take to perform the calculations. In this video tutorial, we would data log the time and plot the data.

Това е възможно най-обикновеният робот, който следва линии. При него има само един сензор в предната част между двете задвижващи колела и използва греди за шарнири вместо трето колело. Опитайте да го направите. Следвайте инструкциите и след няколко минути вече ще можете да следвате линии.
There comes a time when you need to program the robot to "follow a line, but if another sensor detects something you would like to stop, do some work, and then continue following the line". This is applicable to competition robots as it is applicable to real-life robots.
There comes the State Machine Pattern. An advanced and very powerful concept that allows you to easily implement complex robot behaviours with a simple, well-organized, extensible, bug-free program where the robot could be in 1,2, 10 or 100 states and you will still be able to manage the complexity of the world around the robot.

This package contains the three blocks used in the advanced calibration section of the FLL course.
The blocks contained are:

This is the example program using the blocks available at Blocks Package for Advance Calibration of LEGO Mindstorms EV3 Color/Light sensors. The program makes the robot find the minimum and maximum values and to calibrate the current sensor value depending to the min and max.

These are the programs for our boxing robots and their Joysticks. They are made for a game of two fighters with their respective joysticks, fighting until one is knocked out or its "heart" touch sensor is punched by the other robot. The fighters require the two "leg" motors to be connected on ports B and C and the hand medium motors on port D. The touch sensors should be connected on port 1, however keep in mind that the game may be better without them. The distance sensor has no purpose in the program as it is used only for aesthetics. The joysticks require the motor for forward and backward to be connected on port B and the motor for left and right to be connected on port A. The touch sensor operates the hands and must be connected on port 4.
Третото ниво по Роботика с LEGO за ученици от втори, трети и четвърти клас.
В занятията се набляга на по-сложни и предизвикателни роботи. Въвежда се новата конструкция за „условие“. Учениците се запознават с физическите понятия: инерция и център на тежестта. Изграждат се роботи с два сензора и едновременно се работи с тях. Роботите започват да стават по-умни като могат самостоятелно да вземат сложни решения. „Шпионски“ роботи преследват своите цели, като се предпазват да не бъдат забелязани.
Четвъртото ниво от учебната програма по Роботика с LEGO за ученици от втори, трети и четвърти клас.
Учениците строят множество роботи с вериги. Въвежда се сензорът за светлина, който роботите използват, за да разпознават цветовете на обектите около тях. Запознават се с възможностите на зъбните колела, тяхната употреба и основни конструкции включващи зъбни колела. Роботите могат да спират на черна линия и да следват маршрут отбелязан с цветна линия на пода.

Умджахо, от езика на племето Зулу, означава състезание.
Роботът има три сензора: за допир, за цвят и за разстояние. Използва сензора за допир, за да разбере, кога да тръгне; сензора за цвят, за да следва линия и сензора за разстояние, за да спре, когато засече робот пред себе си.
Минтонет (от англ. Mintonette) идва от името на една от първите версии на волейбол.
Роботът може да се движи само настрани, без да завива, с помощта на един голям EV3 мотор. Друг голям мотор се използва, за да изстрелва топката. Има и сензор за разстояние, с който може да засича друг робот, на който да подаде топката, или кош, в който да вкара топката.

Минтонета (от англ. Mintonette) е името на една от първите версии на волейбол.
Роботът използва два сензора за допир с които да движи оръдието си наляво и надясно. За да стреля използва цветен сензор. На оръдието си има голям мотор отговорен за стрелбата и среден мотор който мести оръдието.
Барко от испански (Barco) означава лодка.
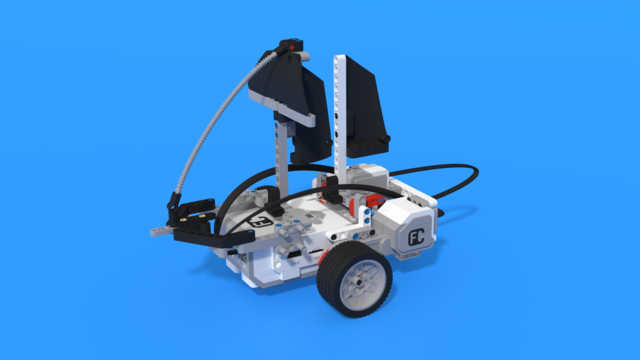
Роботът е направен да прилича на платноходен кораб. За модел е използвана двумачтова шхуна. Това е малък, лек и бърз кораб. Типично за шхуните е да имат тези четириъгълни платна, като на снимката, на главната мачта. Платната са направени от ЛЕГО техник панели. За да се придвижва робота използва два големи мотора с гуми на тях. В задната част на робота има жироскопичен сензор, който помага с маневрирането.
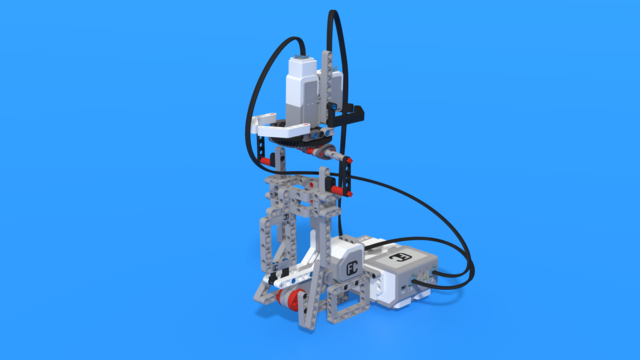
Уйлам е робот, който симулира буря за кораби. Използвани са две бутала задвижвани от един голям мотор и разместени точно на 90 градуса за да създадат клатене подобно на големи вълни. Самият кораб се състои от среден мотор свързан с въртяща плоча и жироскопичен сензор. Целта на този робот е да разгледа кое е най-доброто положение на кораб спрямо вълните, така че да се справи с вълнението на морето.