

Improving FLL Robot Game. Teacher's Note. 9 out of 10 experiments
What should you as a teacher know when the students are trying to achieve a program and robot attachment that could reproduce their behaviour 9 out of 10 times.
- #479
- 15 Apr 2017
What should you as a teacher know when the students are trying to achieve a program and robot attachment that could reproduce their behaviour 9 out of 10 times.

In this video we discuss the durability of the construction of LEGO robots and how do we make them more durable.
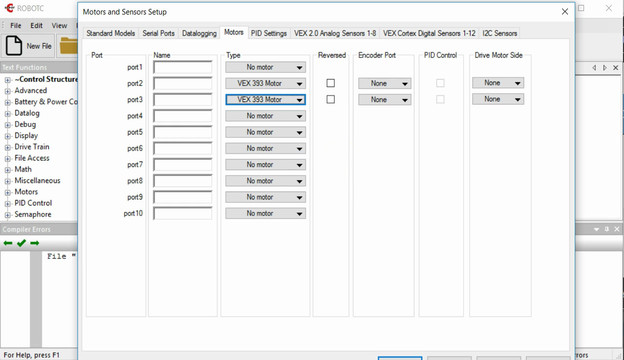
The comunication between the motors and the controller should be configured in the RobotC software. Each motor could be connected on a different port and the goal of the video is to show you how.

Pivot turns require fractions of rotations, a number between 1 and 2. Sometimes it is more convenient to use degrees.
In the software, you can change the "move block" to use degrees.

What should you do as a teacher when the students are calculating the gear ratios and number of needed rotations?

We will share the idea behind that challenge and how to conduct the challenge in a classroom.

Every electronics tutorial, book or course about Raspberry Pi or Arduino will use a motor driver. Very few of the courses will actually explain why do you need a Motor Driver, what is it for?

One of the very common tasks on different FIRST Technical Challenge competitions is to collect objects. In this case, these are colourful specifically shaped plastic object or in simple terms - balls.

When you first start the EV3 brick, you see the recent programs menu. Let's see what it is all about.

With the set for the course, you also have an SD card. It is important that you understand why and how is the SD Card is used.

A special fourth case for a turning with robots with two wheels.

Yes, we know. Starting with the phone when you have a toy car and a Raspberry Pi might seem strange, but this is why we do it.

The next challenge of the course is to build a container where you could store the balls (objects) that you are collecting. The first thing is to see how it works as an end result. You can use the same principle during FIRST Technical Challenge competitions. You can also fire the balls, just by rotating the axle in reverse.

In the EV3-G software, you could use negative numbers for power and rotations. In this episode, we would look at what is the meaning of this numbers and make a few notes of where the teacher must be more careful.

Using Display, Sound, Wait and Move blocks together.

Note for the teacher on making the construction more stable, more durable and using beams for this.

It seems obvious and intuitive how to connect the robot and the computer. We must cover that part, so that we are sure you can download our programs to the robot later on.

How important is it to have predictable behavior in your classes.

The tutorial is about what are the parts that you should buy to have the Ball Collecting mechanism.

How to control the speed of the motors and the speed of the robot.

We are about to connect the whole car with the lights and motors to the controller. Let's recap to know what is ahead of us, what would the process be and what is the end result of the next couple of sections when at the end we have a car controlled by the phone

In the course, we are going to use the following components and hardware elements. It is important to know their names and what are they used for.

We would start connecting a lot of things to the Raspberry Pi. It will be good if we could have some way of referring to the pins on the Raspberry Pi. For example like Pin 5 or Pin 26. Luckily there is such a way.

Why we change the robots all the time and what to observe in each new robot.

How to keep the discipline in the classroom and how to cheer up the students.

We need to extend the cables to be able to connect them to our Raspberry PI. We must also add new connectors at the end of the cables.
