

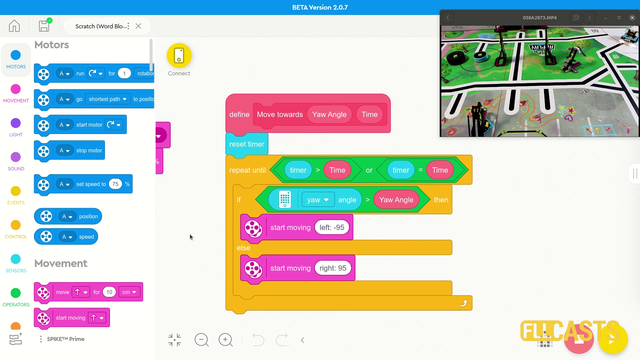
WRO Elementary 2015. Field Run. Part 2
Showing the same run, but from a different angle. This allows you to see more of the way we sensors work and how exactly the robot positions itself.
- #192
- 27 Dec 2015
Showing the same run, but from a different angle. This allows you to see more of the way we sensors work and how exactly the robot positions itself.

This video tutorial is about understanding the "magic". In this video tutorial, we would conduct an experiment and will look at how exactly does the integral part of the PID algorithm compensate for the error that the LEGO Mindstorms EV3 robot makes.

Sometimes when we are working with sensors it is important that the time between two consecutive samples is the same. This will make each sample equally important and independent of how much time it took to take it. In this video tutorial, we would use the EV3-G timer block to make a "WaitForTick" program where the time between each sample of the EV3 Gyro takes exactly 0.02 seconds.

In this tutorial, we would implement a program that finds the minimum and maximum value detected by the sensor and stores this two values in an array.

In this video tutorial we demonstrate the classic algorithm for following a line with robots. It is widely used in FIRST LEGO League competition and could be applied to LEGO Education SPIKE Prime and to other robots also. The algorithm follows a line by moving to the left and to the right and trying to stay at the edge of a black line.

Many times we just upload blocks and leave it up to you to use it. In this tutorial, I would like to show you how to use the implemented blocks. How to import them into the EV3-G software. How to see them in the palette. How to drag and drop them to build a working program.

After we take each sample, we perform calculations and these calculations could take different time. It is important to know how much time does it take to perform the calculations. In this video tutorial, we would data log the time and plot the data.

"Array initialization" is the first step in every program that involves Arrays. This applies to most programming languages and for EV3-G it is a must.
In this tutorial, we would show you how to initialize the array and how to extract this logic in a new block

This is one of the last tutorials in the LEGO Education SPIKE Prime programming for Competitions course and it demonstrates what we've all been waiting for - how to reach a mission model from base in a reliable and consistent way when the mission model is on the other end of the field. Naturally what we use are all the different concepts that we've learned in the course and the tutorial is more advanced than the other so if anything is not clear take a look also at the different tutorials an concepts in the course.

In the course section for Advance Sensor Calibration we previously showed you how to find the minimum and maximum value for a single LEGO Mindstorms Color Sensor and to store this value in an array. The program was implemented with the EV3-G software. In this tutorial we are going to find the Min and Max for all the four sensors and to store all the 8 values in an array.

Implement a program for stopping at a black line with the blocks containing the implementation details for the InitArray, Calibration and Getting the calibrated result.

In this video tutorial we demonstrate a really important concept for FIRST LEGO League competitions - you position the robot on the field with depending on timers and rotations. The issue with moving the robot for 10 seconds and then stopping is that every time it is in a different location. Same for rotations. The wheels will slip, the battery will change, something will happen and the robot will not be in the same place every time. This is not consistent and reliable.

In this video tutorial we show how you can build robots that position on the field consistently and reliably by following and line and then aligning to a line. We also demonstrate the concept of "double align" which is quite powerful and even if there were some mistakes they will be handled.

In this video tutorial we try to move forward with a LEGO Mindstorms Robot Inventor robot and we try to keep a straight line using the Motion Sensor. Without entering into the details of the programming we demonstrate what is the behavior of the robot when trying to keep a straight line with the Motion Sensor while we are participating in a FIRST LEGO League competition.

On of the most precise ways to position on the FIRST LEGO League and other competition fields is to follow and align and in this tutorial we demonstrate exactly this - how consistent and reliable this method is to reach specific mission models. In this way you know that every time you will be at the right place, which is great.

Following the Advance Light/Color sensors calibration for a minimum value for a single sensor tutorial, in this one, we continue with finding the maximum value detected by a sensor and storing this value in an array.

With this 10 runs we demonstrate the consistency and reliability that could be achieved with a LEGO Education SPIKE Prime robot and a 2-states simple line following algorithm. It is not bad. Still there are some things you should consider when using this program and one of the things is the use of the timers
In this video tutorial we use the LEGO Education SPIKE Prime Motion Sensor to reach a mission model on the field. It's a basic use of the motion sensor that we will extend in the next few tutorials and in the same time we take the opportunity to demonstrate what a MyBlock is and how to develop one. As a result of this video you will learn how to make the program easier to read and maintain by organizing the blocks in the program in special MyBlocks that couple them all together.

As an exercise try to implement the calibration of the minimum and maximum values for a single sensor.

On the topic of following lines with a robot there is a way to make the robot follow the line a little more precisely. This method is called "Multi-states" program. Or at least we call it like this. In this tutorial you will see how we program 5 state for the robot line following program. This could be particularly important with FIRST LEGO League competitions where we must build consistent and reliable robots.

Implement the program for array initialization.
Follow the video tutorials for initializing arrays and implement the program.

With this first tutorial on the Motion Sensor in the LEGO MINDSTORMS Robot Inventor course we demonstrate the basic algorithm for moving in a straight line with the Motion Sensor. From here all the other algorithms are modifications, and if you know the basic it will be easier to tweak the behavior for your particular challenge

Is it better to do fast turns or slow turns? Should you save some time by turning fast or should you be more precise by turning slow. Where is the balance? This video tutorial demonstrates exactly this for LEGO Education SPIKE Prime robot, their motion sensor and an ever occurring question on FIRST LEGO League competition which is how to find the balance and where is the balance.

Following the previous tutorials from the course, implement the calibration of the minimum and maximum values.

In this video tutorial we take a next step in programming reliable and consistent robots and this is to learn how to stop at a second intersection. We need this because most of the time when we want to reach a mission model on a robotics competition field, the model will be located away from us and we must use all kind of technique to reach it. In this tutorial - we stop at a second intersection.

A common question is how to display arrays on the LEGO Mindstorms EV3 brick screen. Displaying values from an array is not different from any other display operation. In this tutorial, we would look at displaying two specific values. The minimum and the maximum for a specific sensor from the Advance Calibration Course Section

We use a sensor so the robot must be reliable and accurate right? Wrong. The robot is not reliable and accurate only because we use sensors and that's really important during FIRST LEGO League competition. There is a reason for this and in this tutorial we demonstrate and explain how the robot behaves with a basic use of the Motion Sensor to move straight. As a result you will learn why is it important not to stop at this stage and to go to the next level with more advance use of sensors.