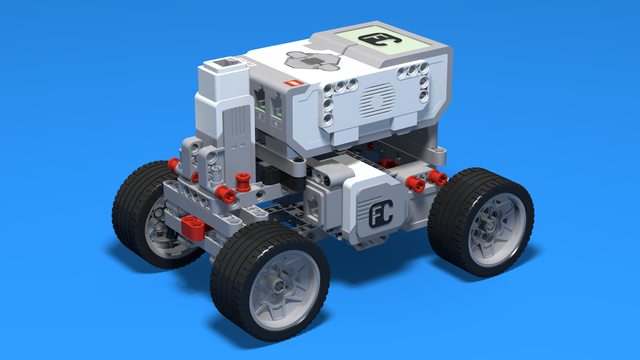
Let's connect the second motor on the other side. Mirrored.

To access the full video please subscribe to FLLCasts.com
- #606
- 13 Aug 2017
Second motor
After the teacher has approved the way of attaching the first motor, you can proceed to attaching the second motor as well. It should be attached in the same way as the motor on the other side.
Be careful with the position
Be careful not to attach the motor further or closer compared to the other motor!

Mirror Image
Moreover, make sure the second motor is a mirror image of the first motor.
Examples of mirror images are your hands and your shoes. Be careful not to build two left shoes for your robot as it won’t be able to move.
Courses and lessons with this Tutorial
This Tutorial is used in the following courses and lessons

Level A2. "Space exploration". Robotics with LEGO
The second level of the Robotics with LEGO curriculum for students in second, third or fourth grades.
A new sensor is introduced - the Ultrasonic distance sensor can help the robot avoid obstacles. Students work with new concepts like loop, degrees and medium motor. Robots can now do two different actions at the same time - while solving missions on a field, the third motor clears detected obstacles. The first robot with chain-treads is built.
- 63
- 3:02
- 117

Build a robot without instructions (advanced)
It is time to construct our first robot without instructions. As with every other task we will divide it into several smaller tasks. Make sure you ask your teacher for feedback after each completed task, before moving to the next one.
The tasks will be as follows:
- Firmly attach a motor to the brick;
- Attach a second motor on the other side of the brick in the same way;
- Build wheels on both motors;
- Construct a third wheel.
- 6
- 0
- 3
- 3d_rotation 0
Level A2. "Space exploration". Robotics with LEGO
The second level of the Robotics with LEGO curriculum for students in second, third or fourth grades.
A new sensor is introduced - the Ultrasonic distance sensor can help the robot avoid obstacles. Students work with new concepts like loop, degrees and medium motor. Robots can now do two different actions at the same time - while solving missions on a field, the third motor clears detected obstacles. The first robot with chain-treads is built.
- 63
- 3:02
- 117
Build a robot without instructions
It is time to construct our first robot without instructions. As with every other task we will divide it into several smaller tasks. Make sure you ask your teacher for feedback after each completed task, before moving to the next one.
The tasks will be as follows:
- Firmly attach a motor to the brick;
- Attach a second motor on the other side of the brick in the same way;
- Build wheels on both motors;
- Construct a third wheel.
- 7
- 0
- 4
- 3d_rotation 0

Level A1. Introduction. Robotics with LEGO
Introduction to robotics - The first level of the Robotics with LEGO curriculum for students in second, third or fourth grades. A journey in space, with robots. Various constructions with robots are built. Learn how to control the motors so that the robot navigates around the Sun, the Moon and Earth in various ways. Getting to know the first of the sensors. The robot can feel its surroundings with the help of the Touch sensor and avoid obstacles.
- 142
- 133:42
- 187
Build a robot without instructions
Let’s start with the first task: Connect a motor to the EV3-Brick.
- 6
- 0
- 4
- 3d_rotation 0
Level A1. Introduction. Robotics with LEGO
Introduction to robotics - The first level of the Robotics with LEGO curriculum for students in second, third or fourth grades. A journey in space, with robots. Various constructions with robots are built. Learn how to control the motors so that the robot navigates around the Sun, the Moon and Earth in various ways. Getting to know the first of the sensors. The robot can feel its surroundings with the help of the Touch sensor and avoid obstacles.
- 142
- 133:42
- 187
Build a robot without instructions
It is time to construct our first robot without instructions. As with every other task we will divide it into several smaller tasks. Make sure you ask your teacher for feedback after each completed task, before moving to the next one.
The tasks will be as follows:
- Firmly attach a motor to the brick;
- Attach a second motor on the other side of the brick in the same way;
- Build wheels on both motors;
- Construct a third wheel.
- 6
- 0
- 4
- 3d_rotation 0
Level A2. "Space exploration". Robotics with LEGO
The second level of the Robotics with LEGO curriculum for students in second, third or fourth grades.
A new sensor is introduced - the Ultrasonic distance sensor can help the robot avoid obstacles. Students work with new concepts like loop, degrees and medium motor. Robots can now do two different actions at the same time - while solving missions on a field, the third motor clears detected obstacles. The first robot with chain-treads is built.
- 63
- 3:02
- 117
Build a robot without instructions (advanced)
It is time to construct our first robot without instructions. As with every other task we will divide it into several smaller tasks. Make sure you ask your teacher for feedback after each completed task, before moving to the next one.
The tasks will be as follows:
- Firmly attach a motor to the brick;
- Attach a second motor on the other side of the brick in the same way;
- Build wheels on both motors;
- Construct a third wheel.
- 6
- 0
- 3
- 3d_rotation 0
Level C1. "Transportation". Robotics with LEGO
This is the fifth level in the Robotics with LEGO curriculum for students in third or fourth grade.
For the first time robots with steering wheels are built in this level. Those robots use one or two drive motors. The work of the differential and its usage in vehicles is explored. Students learn in-depth the working of the light sensor to create better line-following programs. The first two-wheeled motorcycle-robot is built.
- 33
- 1:03
- 110
Build a robot without instructions
Let’s start with the first task: Connect a motor to the EV3-Brick.
- 6
- 0
- 4
- 3d_rotation 0

Robotics with LEGO - Level 1.0 - Adventure in Space
The first level of the Robotics with LEGO curriculum for students in fifth to twelfth grades.
Various constructions with robots are built. Learn how to control the motors so that the robot navigates around the Moon and Earth in various ways. Getting to know the first two sensors. The robot can feel its surroundings with the help of the Touch sensor and avoid obstacles.
The Ultrasonic distance sensor can help the robot avoid obstacles. Students work with concepts like loop, degrees and medium motor. Robots can now do two different actions at the same time - while solving missions on a field, the third motor clears detected obstacles.
- 126
- 123:52
- 150
Building a robot without instructions (advanced)
It is time to construct our first robot without instructions. As with every other task we will divide it into several smaller tasks. Make sure you ask your teacher for feedback after each completed task, before moving to the next one.
The tasks will be as follows:
- Firmly attach a motor to the brick;
- Attach a second motor on the other side of the brick in the same way;
- Build wheels on both motors;
- Construct a third wheel.
- 6
- 0
- 3
- 3d_rotation 0

Robotics with LEGO - Level 1.5 - Spy games
The second level of the Robotics with LEGO curriculum for students from fifth to twelfth grades.
Students build multiple robots with thread chains and become familiar with the physical concepts of momentum and center of gravity. The concept of gears, their use and basic constructions involving gears are studied.
The new concept of "condition" is introduced in programming. Robots are becoming smarter as they can make complex decisions on their own. "Spy robots" follow their targets and avoid being noticed. This level introduces the light sensor which the robots use to recognize the colors of the objects they are looking for. Robots can stop on a black line and follow a route marked with a colored line on the floor.
The spy's most complex mission in the end of the level is to turn into a sumo wrestler and defeat any other robot in the ring.
- 56
- 12:47
- 136
Свободно строене на робот без инструкции
It is time to construct our first robot without instructions. As with every other task we will divide it into several smaller tasks. Make sure you ask your teacher for feedback after each completed task, before moving to the next one.
The tasks will be as follows:
- Firmly attach a motor to the brick;
- Attach a second motor on the other side of the brick in the same way;
- Build wheels on both motors;
- Construct a third wheel.
- 6
- 0
- 7
- 3d_rotation 0
Robotics with LEGO - Level 2.5 - Maritime Journey
The fourth level of the Robotics with LEGO curriculum for students from fifth to twelfth grades.
In this level students focus on the rotational sensor that is part of every motor in the robotics set. Students also learn to use the fourth sensor in the robotics set - the gyro sensor.
First few robot constructions imitate sea-animals and their behavior. Students create programs that check whether the robot's claws or pecks have successfully caught an object. That sensor in the motors allows the robots to go back in their lairs even after the use of unlimited movement. The rest of the robots are modeled after boats, yachts, and ships. With the help of the gyro sensor, students can set a course for their robots to a given angle and can detect deviations from the course. In open seas, there may be sea-monsters and the robots are being programmed to detect a sudden change in acceleration with the help of the said sensor.
- 42
- 3:52
- 133
How to build your own yacht
It is time to construct our first robot without instructions. As with every other task we will divide it into several smaller tasks. Make sure you ask your teacher for feedback after each completed task, before moving to the next one.
The tasks will be as follows:
- Firmly attach a motor to the brick;
- Attach a second motor on the other side of the brick in the same way;
- Build wheels on both motors;
- Construct a third wheel.
- 4
- 0
- 6
- 3d_rotation 1