Let's review the LEGO Mindstorms EV3 Intelligent Brick
The EV3 brick is the main computer of your LEGO robot and it has a display, a few buttons and various ports.
Let's review the LEGO Mindstorms EV3 Intelligent Brick
The EV3 brick is the main computer of your LEGO robot and it has a display, a few buttons and various ports.
The openings are called Ports. There are a few types of ports - USB ports, SD port, cable ports.
Cable ports are two types.

On top with letters A, B, C and D are the *output* ports - with these the brick sends commands to the motors.
Below are the input ports with numbers 1, 2, 3 and 4. With these, the brick receives information about the world around it. Usually, sensors provide that information.

There are two USB ports on the brick.
Next to the output ports, there is а micro USB port that is used for establishing a connection with a computer. You are going to download programs from your computer to the Brick via that port.
The other standard-size USB port is used for the so-called "Daisy-chain" mode, where you connect two EV3 Bricks. This mode will be covered later in an advanced EV3 course.

If you happen to need extra memory, you can add an SD card to your EV3 brick. Usually, that is not needed as the robot has 16MB internal memory.
This is the battery and you should leave it alone most of the time. If you happen to open it, here is how you close it back. Keep the spring on position.
The brick is running a simplified linux OS and that is why it starts for about 30 seconds.
Press the central dark gray button to turn on the brick. It boots а Linux OS and starting and stopping the brick will take some 30 seconds after which you will hear a sound signal.
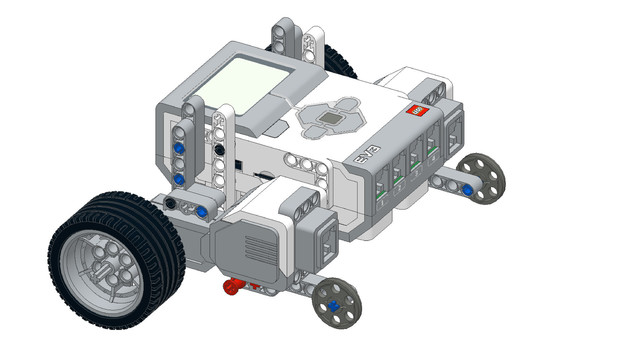
Let's first stop at the main part of the robot. Its brain called 'the brick'.
I'll just remove the brick from the other parts from the motor, so that we can focus on the brick. And this here is the brick. First, it looks like a brick, but it is also interesting that the full name for this part is 'the intelligent brick'. Because as you know in the Lego sets you have small bricks and with these bricks you can build different constructions. And this is an intelligent brick. So, with this brick, you can control the other bricks. It's pretty interesting. Now, for the brick. It has a display. It has a few buttons here. It also has ports and you can see four ports right here - A, B, C and D. And these are the output ports. With these ports you can control different motors. So, with the ports you control the motors. And here you connect the different motors using cables like this. Also, you have a number of input ports. These are the ports from 1, 2, 3 and 4. And on these ports you connect the sensors. And these are input ports because the brick receives information from the world using these ports. And with the output ports the brick sends information to the world. So, input ports, output ports. We also have a PC port. And on this port we connect the USB cable from the computer. We also have one more USB port here. And we have a SD port here. We can add a SD card for an external memory. Also, with the brick we have the battery. And this here is the Lego EV3 Mindstorms battery but when we open it you can see that you can use the bricks with standart AA batteries. We need like six of those. And if you incidentally open the brick and you have the battery detached from the brick, you can return the battery to the brick but when doing so you must be careful for the springs right here. Because if you break them it will be very difficult to repair them and you'll have a malfunctioning brick. You won't be able to start it. Now I'll just return it. And how do you turn on the brick? You press on the button for turning on. And you can see this red light here and it will take something like 30 seconds for the brick to start.
This Tutorial is used in the following courses and lessons

If you are working with students and you want to introduce Robotics to your class or you want to mentor a FLL team, but you are insecure about your technical knowledge in the Robotics field, then this is the right place for you. Having in mind teachers' busy schedule, we have design two different schedules and added an option to design one just for you. FLLCasts's Mindstorms EV3 Robotics Online Training is the perfect match for any teacher.
After the completion of each task the participant has to upload his solution for verification.

Let's review the LEGO Mindstorms EV3 Intelligent Brick
The EV3 brick is the main computer of your LEGO robot and it has a display, a few buttons and various ports.
The things that you will be able to do with your EV3 robot by the end of this course are:
Freely move your robot towards desired target;
Avoid obstacles on the path of your robot using sensors;
Follow lines of any shape;
Detecting and picking up objects of any kind;
Overview of what is going to happen in module 3

The first level of the Robotics with LEGO curriculum for students in fifth to twelfth grades.
Various constructions with robots are built. Learn how to control the motors so that the robot navigates around the Moon and Earth in various ways. Getting to know the first two sensors. The robot can feel its surroundings with the help of the Touch sensor and avoid obstacles.
The Ultrasonic distance sensor can help the robot avoid obstacles. Students work with concepts like loop, degrees and medium motor. Robots can now do two different actions at the same time - while solving missions on a field, the third motor clears detected obstacles.
We will demonstrate the common mistakes students make when building a robot.

Introduction to robotics - The first level of the Robotics with LEGO curriculum for students in second, third or fourth grades. A journey in space, with robots. Various constructions with robots are built. Learn how to control the motors so that the robot navigates around the Sun, the Moon and Earth in various ways. Getting to know the first of the sensors. The robot can feel its surroundings with the help of the Touch sensor and avoid obstacles.
We will demonstrate the common mistakes students make when building a robot.
![Image for [In Development] The fun level - Game-oriented introduction to LEGO robotics](https://d2nmr6p48f8xwg.cloudfront.net/content_pictures/pictures/000/002/636/a4f229bae5979562f6bfe32adc6281e577e312674a0cc5c98f8fdfe15e7c7da9b89f826a037575a5LEGO-Mindstorms-Ev3-Yolanda-Sailship-Robot-Fllcasts.png)
A level, designed for introduction in LEGO-robotics, focused mostly on games. We use goal-oriented challenges to make the students want to accomplish a certain task, learning a lot in the process. Some of the games we have included here are football, bowling, paper-plane competition and many more. It is suitable for studens 8 to 12 years old, but even older students will have a lot of fun with the activities.
This is a brand new course that we are experimenting with in a groups in June 2019. Keep in mind that it is possible to use it for summer camps and groups, but there are a few lessons that will be improved on the fly.

Today the robot we are building is a spaceship once again. The aim for today, however, is exact - to reach the further (dark) side of the moon!
Where is located the dark side? Why is it so hard to be reached? Why is it called "dark"?