We will demonstrate the common mistakes students make when building a robot.
- #347
- 28 Jan 2017
- 6:42
Un/intentional mistakes
The robot will not move exactly as programmed because there are some intentional errors in the construction. Fix these errors and avoid them in future constructions.
Frictionless or frictional
Blue axle pins have intentional friction and are used for stable building. Thеse must be replaced with beige frictionless axle pins. 
Caster wheels
The rear wheels a.k.a caster wheels must not have tires, as tires create friction with the ground during turns which is not desired. We will go into detail about caster wheels later in the course.
Tires distance and bushes
Bushes must be placed between the tire and the motor so that the tire does not move toward the motor and jam it. Also, a bush on the outer side of the rim will prevent the tire from moving out or even falling.
Stability of construction
Stabilize the motors, which are unstable now and need to be stabilized, with a beam connecting them together, or at a second point on the brick.
English
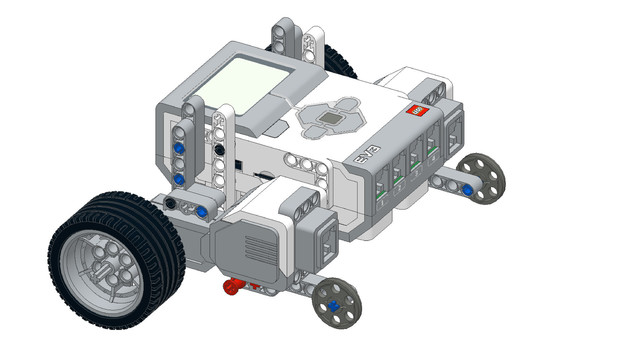
Following the instructions for the Easy Bot you've arrived at a construction but is has a number of problems and this is something that we refer to as common problems. And we've put them here on purpose so that we can discuss them and discuss the solutions of these common problems in most of the EV3 Lego Mindstorms constructions.
First, when you use a wheel in this case the wheel is just a rim and you attach this wheel to a beam. And you can use this: What was the name of this? These are axle beams - the blue one. But the interesting thing about these pins is that there is some friction between the pin and the beam. And it's difficult to rotate the wheel. You should use frictionless. You can see them on the other side of the robot where we have this frictionless axle pin. And here you can freely rotate the wheel. Again the difference: here you can't rotate the wheel it's difficult because there is some friction and here it is very easy to rotate the wheel. So, whenever you attach a rim to a beam use a pin that's a frictionless axle pin. At the back of this robot you can see that there are two wheels. Sometimes, actually most of the time when students construct this robot they add this tire to the wheel like this. It is not in the instructions but they add it. Now, the problem with this approach is that when the robot turns because there is some friction between the tire and the ground it will be very difficult for the robot to turn. You can see that there is some friction. And if you remove it, it will be much more easier for the robot to turn. So, there is no friction at the back of the robot at the back wheels. In this construction do not use the tires on the small rims for the back wheel of the robot. Next, some of the most most common mistake is that when you add an axle to the motor and then a wheel to this axle we just add the wheel to the axle and we don't add any parts here between the wheel and the motor. The problem with this is that sometimes the wheel can get too close to the motor. And when the wheel is too close to the motor it is very difficult to turn this wheel because there is some friction between the tire and the motor. And it's difficult to turn. That's why we have parts like this. These are bushes. And there are different types of bushes. This one is a grey bush and we also have some yellow bushes. What we should do is in most of the constructions there must be a bush one or two on the axle between the motor and the wheel. Then at the other side of the rim we add another bush or two so that when the wheel turns it does not fall from the axle. And it's not uncommon that the wheel can fall especially there are some different movements. And that's the common mistake that most of the students make when they attach a wheel to the motor. Always place some bush between the wheel and the motor. Another common mistake is to build with only one connection point. And we have a very specific example here. You can see the motor that's attached to the brick. And it's attached only at the front of the motor. And the construction in not stable. You can see that the motor is moving. So, the whole construction is not very stable. It is important when building a construction to attach the parts on at least two points. Probably at the front of the motor and at the back of the motor. The way we are going to fix this is we'll take this: What was the name of this part? It was an angled beam with pins. And we add this angled beam with pins here.
Like this. And then we take for example this L shaped beam and with a few black pins we attach the motor to the brick and now you see that this motor - my left side motor is more stable and the right side part of the construction is much more fragile much more unstable. We can also use a part like this.
It's a T shaped beam with a pin and again we fix it. And there are also other ways to connect the motor to the brick. You can also connect both motors to each other. But what's important is to have the connection at at least two points.
Courses and lessons with this Tutorial
This Tutorial is used in the following courses and lessons
EV3 Phi. Introduction to robotics with LEGO Mindstorms
The things that you will be able to do with your EV3 robot by the end of this course are:
Freely move your robot towards desired target;
Avoid obstacles on the path of your robot using sensors;
Follow lines of any shape;
Detecting and picking up objects of any kind;
- 92
- 220:20
- 36

Parts, components and notes about LEGO robot constructions
Overview of what is going to happen in module 3
- 7
- 0
- 1
- 3d_rotation 0

Robotics with LEGO - Level 1.0 - Adventure in Space
The first level of the Robotics with LEGO curriculum for students in fifth to twelfth grades.
Various constructions with robots are built. Learn how to control the motors so that the robot navigates around the Moon and Earth in various ways. Getting to know the first two sensors. The robot can feel its surroundings with the help of the Touch sensor and avoid obstacles.
The Ultrasonic distance sensor can help the robot avoid obstacles. Students work with concepts like loop, degrees and medium motor. Robots can now do two different actions at the same time - while solving missions on a field, the third motor clears detected obstacles.
- 126
- 123:52
- 150
Коригиране и довършване на конструкцията
We will demonstrate the common mistakes students make when building a robot.
- 7
- 0
- 6
- 3d_rotation 0

Level A1. Introduction. Robotics with LEGO
Introduction to robotics - The first level of the Robotics with LEGO curriculum for students in second, third or fourth grades. A journey in space, with robots. Various constructions with robots are built. Learn how to control the motors so that the robot navigates around the Sun, the Moon and Earth in various ways. Getting to know the first of the sensors. The robot can feel its surroundings with the help of the Touch sensor and avoid obstacles.
- 142
- 133:42
- 187
Correction and finalizing the construction
We will demonstrate the common mistakes students make when building a robot.
- 7
- 0
- 6
- 3d_rotation 0