

Why start with the phone set up in the Perfect STEM Course
Yes, we know. Starting with the phone when you have a toy car and a Raspberry Pi might seem strange, but this is why we do it.
- #712
- 01 Feb 2018
Yes, we know. Starting with the phone when you have a toy car and a Raspberry Pi might seem strange, but this is why we do it.

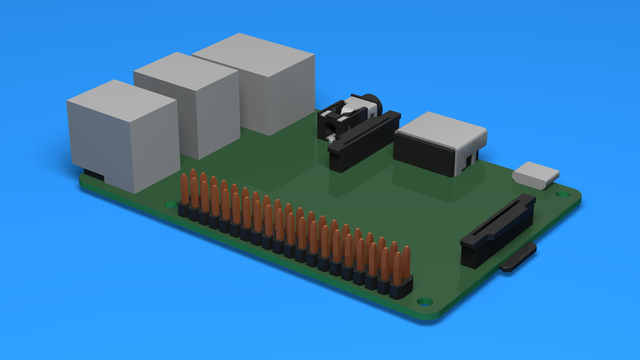
In the course, we are going to use the following components and hardware elements. It is important to know their names and what are they used for.

We've just plugged in the power bank in the Raspberry Pi controller. Has it started? Is it doing something? Why is it not moving? Simply put the raspberry power a small red diode and it just emits light. Well, it's on, but it will do nothing else.
With the set for the course, you also have an SD card. It is important that you understand why and how is the SD Card is used.

This is a disk image containing a Raspbian OS. The image is modified and set up specifically for the Perfect course. It contains all the needed files, libraries and additional tools that we would use in the course. The file is quite large so be prepared to wait some time while downloading.
Checksum: 4d85292f49a9350fcef9f2eb8fd86b77f1c6bd65ce1344848de3e201c9e1d20d

We would start connecting a lot of things to the Raspberry Pi. It will be good if we could have some way of referring to the pins on the Raspberry Pi. For example like Pin 5 or Pin 26. Luckily there is such a way.

Every electronics tutorial, book or course about Raspberry Pi or Arduino will use a motor driver. Very few of the courses will actually explain why do you need a Motor Driver, what is it for?

The power in the car comes from the batteries. The batteries are in a batteries holder. About 5 of them. Two cables are connected to the batteries holder. It is very important to identify which of those cables is the plus and which is the minus.

We are about to connect the whole car with the lights and motors to the controller. Let's recap to know what is ahead of us, what would the process be and what is the end result of the next couple of sections when at the end we have a car controlled by the phone
Step by step guide on how to add the SD card to the Raspberry pi.
The Raspberry Pi must not be powered.
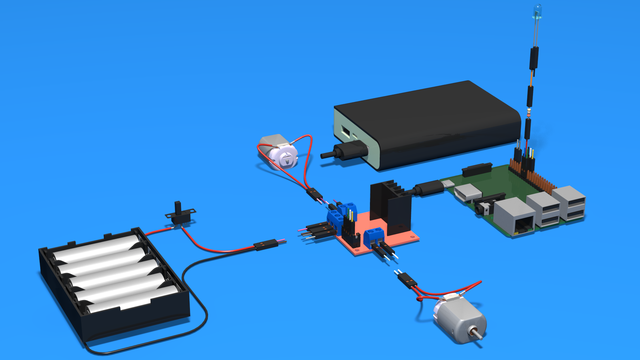
The is the whole step-by-step process of connecting the motors with the Raspberry PI with the driver and the batteries. No scheme needed. Everything is already here. In the course, the motors are part of the car and the batteries are in the batteries holder, but with this scheme, you could see the whole process.

A 3D scheme on how to connect the front steering motor to the Raspberry PI. This includes the Motor Driver and the batteries. The rear motor is also on this scene.

3D scheme with instructions on how to connect the L298N driver to the batteries and to the motor. Just that. Connecting to the Raspberry Pi is at a later stage of the course.

In this 3D scheme, you can see how the motor driver is connected to the Raspberry Pi and to the motor. Follow the steps in the instructions one by one and you will have successfully connected the motor to the Raspberry PI
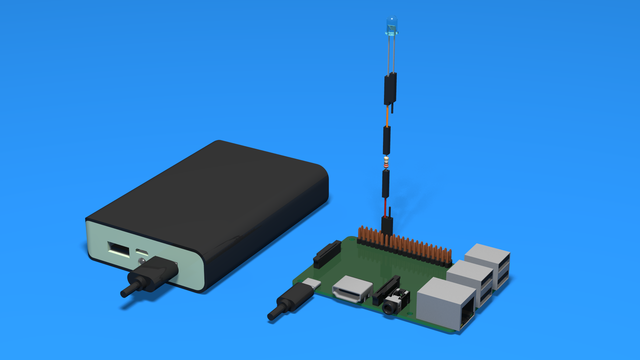
3D Instructions on how to add a diode to the Raspberry Pi and indicate when the Raspberry Pi is turned on.

We have two power sources (batteries) - one power source is for the controller, the Raspberry PI, and one power source is for the motors. What is the separation between the power sources and why it exists? Why do we need two power sources? We need the different power sources because there is not enough power otherwise.
