
How to play football with LEGO Mindstorms Robots. Introduction
Football with robots could be quite fun. Football with LEGO Mindstorms robots is one of the popular categories for competitions with LEGO Mindstorms Robots.
- #945
- 20 Sep 2018
Football with robots could be quite fun. Football with LEGO Mindstorms robots is one of the popular categories for competitions with LEGO Mindstorms Robots.

The robot detects an object. After the object is remove we want to make the LEGO robot move forward.

Complete introduction to the LEGO Mindstorms EV3 Touch sensors from the very first step. In this video tutorial we program the robot to stop on touch sensor pressed. Again, this is based on your feedback that much of our tutorials in previous years were a little more advanced and that we have never made a proper introduction. A few more videos on touch sensor will follow after this
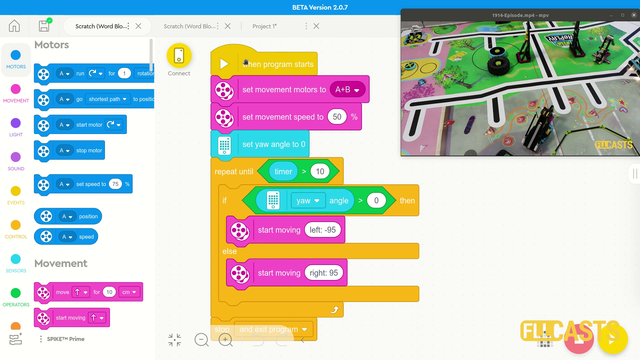

This is the first video tutorial from the LEGO Education SPIKE Prime programming course in which we use a sensor, and we've selected to use the motion sensor. The Motion sensor allows us to detect how the robot turns in a 3-dimensional space-time continuum, or, to put it simply, we use it to move straight with the robot. That's it. We want to move straight - we use a sensor, and the Motion Sensor is a good choice.

Have you even tried to move the robot not in rotations or degrees or seconds, but in metres. In this episode I am building a new block that could be used to move the robot a specific number of millimetres (mm). You could directly download and use it in your programs.

In this video tutorial we look at Acceleration and Deceleration with a LEGO Education SPIKE Prime robot. The goal of the tutorial is to demonstrate the accuracy of the robot when we us default acceleration and slow acceleration.

We just had some enormous amount of fun with building and using a catapult/trebuchet. Yes they are quite different, but the result achieved in the lesson is something in the middle. Learn how to fire elements using the LEGO Mindstorms EV3 or NXT robotics set. Challange yourself, your team or your students to build it and fire elements as far and as accurate as possible.

The previous rubber bands video showed a way to trigger the rubber band without a motor. This video gives one more idea on how to lift an axle and in this way release the rubber band. Use the idea for you LEGO Mindstorms robot constructions.

Stop on detecting an object with the Ultrasonic sensor and move after detecting there is no object. Join of the previous two video tutorials in one

There are many loops in the FIRST LEGO League competition. In this video we collect some of them by following the idea of the ELM team.
The FIRST LEGO League competition is similar each year. With a little experience you could accomplish most of mission. The goal of this episode is to introduce you to the course, its purpose and approach.

Many FLL competitions have a mission for demolition. You should always destroy something, but destroy it in a regulated manner and probably collect the destroyed mission model after that.

Using a number of axles, beams and rubber bands we collect many loops at once. This is an important part of every competition, mostly of the FIRST LEGO League.

This tutorial is about how to follow a wall with an ultrasonic sensor. The example is with a border from a FIRST LEGO League (FLL) competition, but could also easily be applied to other competitions and problems.

We keep the robot orientation straight while moving, but when we stop the robot could be in a different orientation. This applies for both using the Mindstorms Gyro Sensor when moving straight or the Mindstorms Color sensor when following a line. In this video tutorial, we will do a few examples of when an how this could happen.

Робота Икозейтър е конструиран с идеята да може лесно да се променя зъбната му предавка. На видеото може да наблюдавате един начин за смяна на предавката му, като се извади гредата и се разменят зъбните колела на мотора и верижното колело. За предавки с различен размер зъбни колела се иска промяна в дължината на веригата или броя зъбни колела.

This is the final run for our World Robotics Olympiad (WRO) 2015 Elementary Challenge Robot. In "dives", detects the color of the pearl and then counts the number of Ping-Pong balls to release.

We've detected the gap. It's time to move over it. This is difficult because we have to detect where the line is after the 0.1 meters gap on the line following field.

You can collect the car for scrap or repair it. The ELM teams decide to repair it. This requires them to place the engine in the car and it's very interesting to think about this problem.
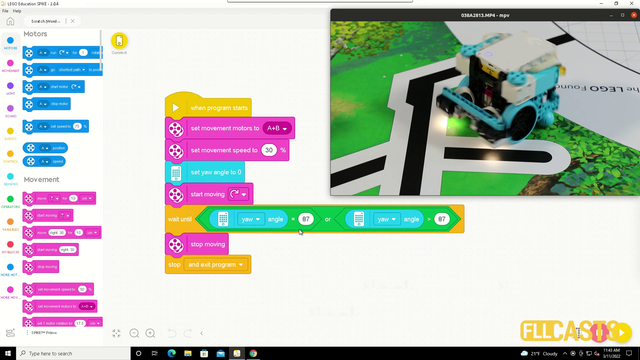
In this video tutorial we demonstrate the use of the motion sensor and how it could be use to turn precisely to 90 degrees. We demonstrate some of the caveats of the sensor and how sometimes it does not work as expected. Like you set the robot to turn until the sensors detects 90 degrees and at the end the robot is not at exactly 90 degrees.

Mantissa, a LEGO Mindstorms Robot, moves and attacks. It uses the ultrasonic sensor and it's two special hands. Follow the building instructions and download the prepared program to directly use the robot.

We create a program for detecting when the Touch Sensor was Pressed/Released. Move until it is pressed, continue when it is released.

Scratch е много добра платформа за да започнете да се учите на програмиране. Ето как да започнете и какво ви трябва да знаете, за да се ориентирате първоначално!

The way sensors and programs work in a robotics system is sometimes not-intuitive for a beginner, but nevertheless very logical. Building a program for a touch sensors for "Press->Go->Press->Stop" using the EV3-G software could be quite challenging at the beginning even for experienced teachers, students and robot builders.

This is a fun video with robots doing the Harlem Shake. We thought about posting the programs for the robots, but actually the whole Harlem Shake is so awkward that we decided not to do it :) Enjoy the video

Специално предизвикателство за програмиране на робота, така че да се движи като йо-йо.

In the first LEGO tutorial we started following a wall with the Ultrasonic Sensor. In this tutorial we would improve the program, remove the zig zag movement and make it very smooth.