
Wobble Line Following
This is the most basic line-following method, commonly known as the "ducky" line-following method.
- #2288
- 02 Aug 2024
This is the most basic line-following method, commonly known as the "ducky" line-following method.

Следването на линия е много често срещана състезателна категория. Ето как можете да започнете в него!

In this 10 out of 10 tutorials we do 10 runs that demonstrated how consistent and reliable it is to stop at the second intersection. This is useful as it is one of the main ways to figure out how to position yourself on the field.

In this video tutorial we take a next step in programming reliable and consistent robots and this is to learn how to stop at a second intersection. We need this because most of the time when we want to reach a mission model on a robotics competition field, the model will be located away from us and we must use all kind of technique to reach it. In this tutorial - we stop at a second intersection.

On of the most precise ways to position on the FIRST LEGO League and other competition fields is to follow and align and in this tutorial we demonstrate exactly this - how consistent and reliable this method is to reach specific mission models. In this way you know that every time you will be at the right place, which is great.

With this video tutorial we demonstration the consistency and reliability of the using an intersection to position on the field. We move forward and we stop at the first intersection. We detect the intersection with a sensor. In the whole 10 runs there isn't a single mistake and you can see the precision of the robot on each run. Check it out and experiment with the same program for your robot.

In this video tutorial we demonstrate a really important concept for FIRST LEGO League competitions - you position the robot on the field with depending on timers and rotations. The issue with moving the robot for 10 seconds and then stopping is that every time it is in a different location. Same for rotations. The wheels will slip, the battery will change, something will happen and the robot will not be in the same place every time. This is not consistent and reliable.

In this video tutorial we show how you can build robots that position on the field consistently and reliably by following and line and then aligning to a line. We also demonstrate the concept of "double align" which is quite powerful and even if there were some mistakes they will be handled.

Using everything that we've learned about LEGO Education SPIKE Prime competition programming we arrive at the final boss mission - how do we consistently reach a mission model at the other end of the field. Consistently. Every time. We use line following, motion sensor, counting of lines and border alignment. All the different concepts that we've looked at separately are now implemented together.

In this video tutorial we follow a line 10 consecutive times. In this way we demonstrate whats the consistency that you could expect from the robot when following a line with a multi-states algorithm.

With this 10 runs we demonstrate the consistency and reliability that could be achieved with a LEGO Education SPIKE Prime robot and a 2-states simple line following algorithm. It is not bad. Still there are some things you should consider when using this program and one of the things is the use of the timers

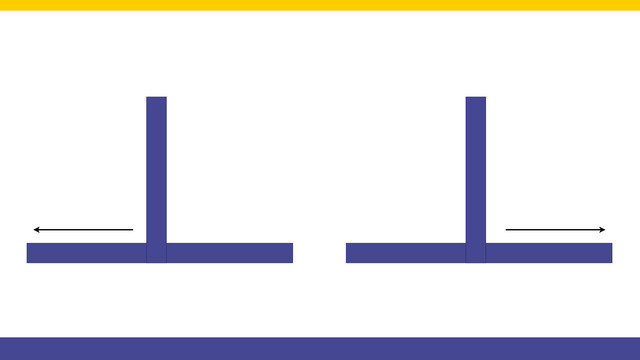
In this video tutorial we demonstrate the classic algorithm for following a line with robots. It is widely used in FIRST LEGO League competition and could be applied to LEGO Education SPIKE Prime and to other robots also. The algorithm follows a line by moving to the left and to the right and trying to stay at the edge of a black line.

This tutorial demonstrates how a robot could align to a black line. The code for the program is available in the course. Aligning to black lines is popular at robotics competitions like FIRST LEGO League as it is the primary way to know where you are on the field and to develop a program that is reproducible. The attachment uses Luly, a small LEGO Education SPIKE Prime competition robot with 3D building instructions as a robot base.

We discuss the state of "Lost" and the different ways we could escape this state. We also build the next step of our State machine programming pattern where the next state is determined by the previous state.
All worked as expected, up until know because the robot got lost. This happens when we turn right and the line does not continue to the right. Now the robot must somehow understand that it is "lost" and escape.

We can Turn Right. We can Turn Left. How do we decide which way to go if there are lines both to the left and to the right. Check out the video.

Next state in our state machine programming pattern is the "Turn Left" state and the corresponding behaviour.

Next important state is Turn Right with our robot. This happens when we detect a line on the right.

We've detected the gap. It's time to move over it. This is difficult because we have to detect where the line is after the 0.1 meters gap on the line following field.

It's inevitable. While following this gapped line we would reach a gap. The robot must somehow understand that there is a gap and must make a decision on what to do. For detecting the gap we use the Rotation Sensor. Not the most popular, but very convenient in many cases. Check out the video.

The final video from the course. The robot escapes the state where it is lost. This happens if it can not continue in any direction.

We follow a line. We start from the Smooth Proportional Line Following program and modify it a little for this program. We follow the line with the middle sensor attached on port 2.

We list the number of decisions that the robot is making while following the line. Then, we group them and decide on the number of sensors to be used.
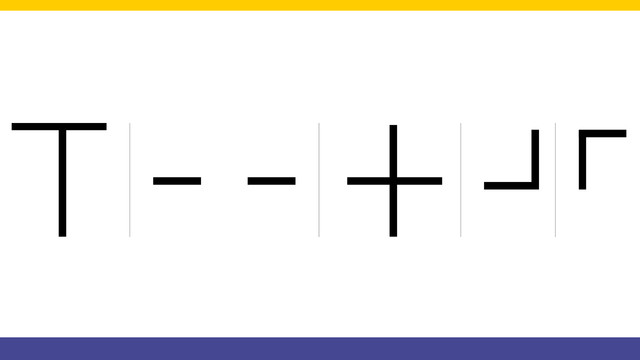
Looking at the field we must first think of a strategy of solving this line following problem. There are rules that the robot must follow and these rules should be programmed in the robot.
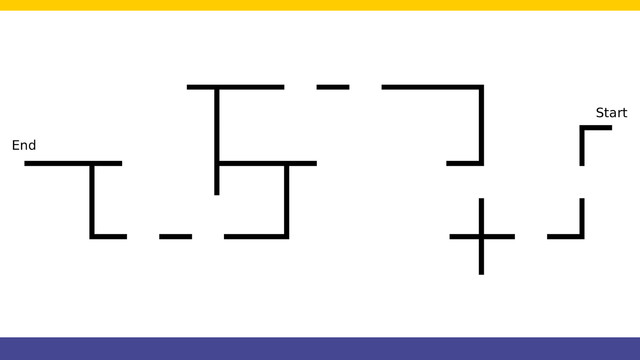
We start a course for following a line with crosses and gaps. This is a challenge that one of the users at FLLCasts.com was trying to accomplish and asked us for advice. We present the whole challenge to you step-by-step. But first, let's also see the whole run of the line following algorithm. With this course, we also do an introduction of using State Machine as a programming pattern.

This video lesson is a revised version of Episode #1. Matt Gipson requested it in a comment. Using the EV3-G software we have developed a very simple program for following a line with two LEGO MINDSTORMS color/light sensors.

In this tutorial we introduce the basic algorithm for following a line with one sensor and review the algorithm for quickly followwing a black line with one sensor, implementing both with the Mindstorms EV3 robotics kit.