Building Instructions - -
Filters:

LED strip display program
Download button at the bottom.
This is a program we created for the LED strip display course.
#include <Adafruit_NeoPixel.h>

#define  LED_COUNT 20
#define  StripPin A2
#define  HallEffectSensorPin 6
#define  HallEffectGNDPin 5
#define  HallEffectVCCPin 4

int startSeconds = 20;
int startMinutes = 10;
int startHours = 1;

int secondsArrow;
int minutesArrow;
int hoursArrow;

int arrowPosition;

int hallSensorPastState = LOW;
int hallSensorRead;
int timeForOneRotation = 1;
unsigned long RPMTimer = millis();

Adafruit_NeoPixel leds = Adafruit_NeoPixel(LED_COUNT, StripPin, NEO_GRB + NEO_KHZ800);

int color[3] = {255, 100, 150};
int secondsColor[3] = {255, 0, 0};
int minutesColor[3] = {0, 255, 0};
int hoursColor[3] = {0, 0, 255};

void setup(){
  pinMode(HallEffectSensorPin, INPUT);
  pinMode(HallEffectGNDPin, OUTPUT);
  pinMode(HallEffectVCCPin, OUTPUT);
  digitalWrite(5, LOW);
  digitalWrite(HallEffectVCCPin, HIGH);

  leds.begin();
  leds.setPixelColor(19, color[0], Color[1], color[2]);
}

void loop(){
  RPMUpdate();
  ClearLedsWithoutTheLastOne();
  arrowPosition = StateFrom60();

  secondsArrow = ((int) floor(( millis() / 1000) + startSeconds) % 60);
  minutesArrow = ((int) floor(( millis() / 60000) + startMinutes) % 60);
  hoursArrow = ((int) floor(( millis() / 3600000) + startHours) % 12) * 5;

  if (arrowPosition == secondsArrow){
    for (int i = 0; i < LED_COUNT - 3; i ++){
      leds.setPixelColor(i, secondsColor[0], secondsColor[1], secondsColor[2]);
    }
  }

  if (arrowPosition == minutesArrow){
    for (int  i = 0; i < LED_COUNT - 6; i ++){
      leds.setPixelColor(i, minutesColor[0], minutesColor[1], minutesColor[2]);
    }
  }

  if (arrowPosition == hoursArrow){
    for (int i = 0; i < LED_COUNT - 10; i ++){
      leds.setPixelColor(i, hoursColor[0], hoursColor[1], hoursColor[2]);
    }
  }

  if (arrowPosition % 5 == 0){
    leds.setPixelColor(18, color[0], color[1], color[2]);
    leds.setPixelColor(17, color[0], color[1], color[2]);
  }
  leds.show();
}

void RPMUpdate(){
  hallSensorRead = digitalRead(HallEffectSensorPin);

  if(hallSensorRead != hallSensorPastState){
    if(hallSensorRead == HIGH){
      timeForOneRotation = millis() - RPMTimer;
      RPMTimer = millis();
      hallSensorPastState = HIGH;
    }
    else{
      hallSensorPastState = LOW;
    }
  }
}

void ClearLedsWithoutTheLastOne(){
   for(int i = 0; i < LED_COUNT - 1; i ++){leds.setPixelColor(i, 0);}
}

int StateFrom60(){
   return (int)floor(((millis() - RPMTimer) * 60) / timeForOneRotation) % 60;
}
- #3749
- 13 Sep 2025


Connect Front Steering Motor to Raspberry Pi - 3D Scheme
A 3D scheme on how to connect the front steering motor to the Raspberry PI. This includes the Motor Driver and the batteries. The rear motor is also on this scene.
- #507
- 10 Apr 2018

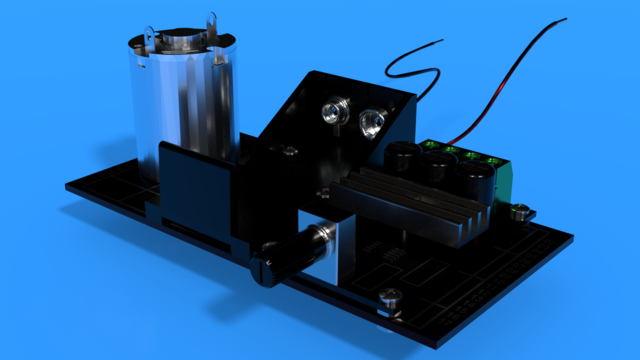
How to connect L298N Motor Driver To Batteries Power - 3D Scheme
3D scheme on how to connect the L298N Motor Driver to the Batteries. Follow the step-by-step instructions. Be careful about the PCB terminal connectors.
- #505
- 10 Apr 2018

How to connect L298N To Motor And Batteries
3D scheme with instructions on how to connect the L298N driver to the batteries and to the motor. Just that. Connecting to the Raspberry Pi is at a later stage of the course.
- #506
- 10 Apr 2018

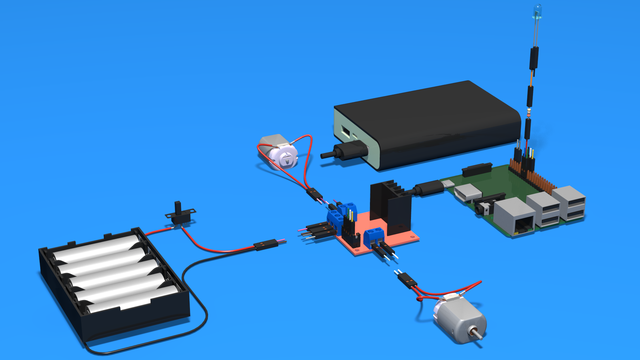
Perfect Course Connecting Raspberry Pi - Motor Driver - Batteries - Motors
The is the whole step-by-step process of connecting the motors with the Raspberry PI with the driver and the batteries. No scheme needed. Everything is already here. In the course, the motors are part of the car and the batteries are in the batteries holder, but with this scheme, you could see the whole process.
- #464
- 10 Apr 2018

How to connect Rear Motor To Motor Driver and to Raspberry PI - 3D scheme
In this 3D scheme, you can see how the motor driver is connected to the Raspberry Pi and to the motor. Follow the steps in the instructions one by one and you will have successfully connected the motor to the Raspberry PI
- #504
- 10 Apr 2018
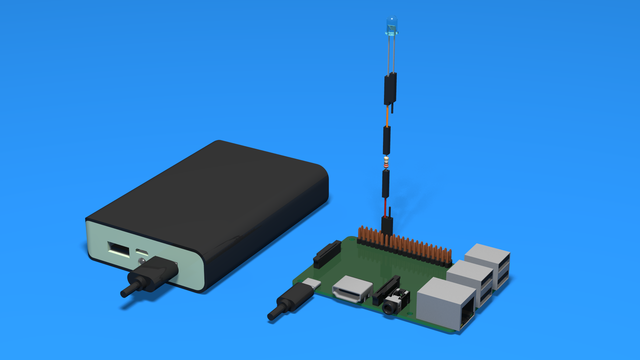
How to Add a diode to indicate controller power up - 3D Scheme
3D Instructions on how to add a diode to the Raspberry Pi and indicate when the Raspberry Pi is turned on.
- #502
- 10 Apr 2018
Insert The SD Card into the Raspberry Pi
Step by step guide on how to add the SD card to the Raspberry pi.
The Raspberry Pi must not be powered.
- #501
- 10 Apr 2018

How to connect a Light Emitting Diode (LED) directly to Batteries
These are 3D building instructions on how to connect a diode directly to the batteries and turn it on.
- #443
- 17 Mar 2018

FTC Push Bot Chassis from Tetrix
This is the chassis for the popular FTC Push Bot. The robot is built with the Tetrix set and uses two motors. When preparing for a FIRST Technical Challenge competition (FTC) it is very useful to have a chassis from which you could start working. It might not, and will surely not be the final robot, but a good base is always useful.
With this chassis, we've also made a short course of how to control it. Take a look at FIRST Technical Challenge. Basic GamePads, control and attachments for the Tetrix set.
- #382
- 02 Jan 2018
- 1
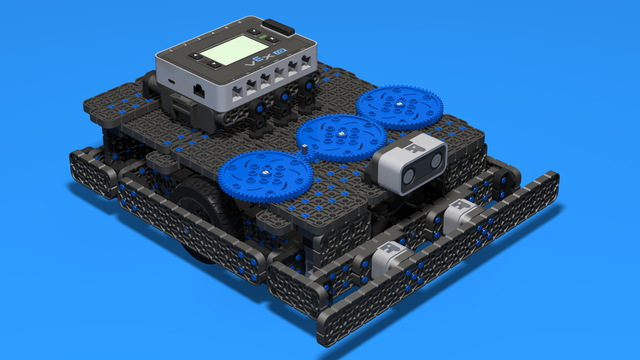
VEX IQ Robot Base 4
It's a VEX IQ robot base with all VEX IQ Sensors. The robot has 1 x Gyro, 1 x Ultrasonic, 1x Color Sensor, 2 x Toch Sensors, 1 x Touch Led Sensor.
- #314
- 14 Jul 2017

