How do you lift heavy objects with an attachment? In this episode we show a simple, interesting, but yet not very popular way to lift something heavy with and LEGO Mindstorms EV3 robot and without gears and motors as attachment. As a specific example we are using the Strength Exercise mission from the FIRST LEGO League 2012 competition.
- #61
- 09 Nov 2014
- 5:34
- LEGO MINDSTORMS, LEGO MINDSTORMS EV3
- Lift, FIRST LEGO League, FIRST LEGO League 2012-2013 Senior Solutions, Attachments, FLL 2012, EV3, FLL, Construction
Many of the constructions in the LEGO world mimic the "real"/"engineering" world. But initially students need some time to come to such solutions and must see them somewhere. In this episode we are building an attachment that follows an interesting principle for lifting heavy objects. Our observation is that this are hardly ever used in competition.
Try to follow the same principle to push objects, not only lift them. If you use the attachment share with us the results and what have you achieved with it.
Instructions and rules for the use of the heavy lifting model can be found at FIRST LEGO League 2012 competiton materials

English
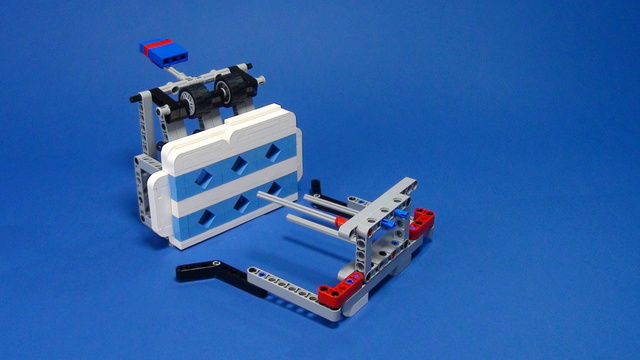
In this tutorial I'll take a look at the strength exercise from the 2012 First Lego League Challenge. In the next few minutes I'll introduce you to an interesting way to complete the mission with a detachable attachment. Now let's see how the final version of the attachment would look like.
I'd like to show you how we've come to this attachment. In the beginning there was this square frame which actually is the scissor mechanism. The main idea is that the robot will push the mechanism from one side and the model will resist from the other which will make the mechanism stretch and lift the lever which will complete the strength exercise mission from the 2012 First Lego League Challenge. What we'll do next is build on this mechanism, so that we could attach it to the robot and see what other problems we will face. I have built this frame at the back of the mechanism and I'll focus on two key features of it. First, I have this axle here which is used not only for supporting this beam but also for preventing the mechanism from falling down so it's a little bit stretched at anytime. Next, we have this rail here. So, we have these two beams at the front of the robot and they are sliding into the frame. So, in the end, the attachment looks like this. Now, if we push the robot towards the model, it will stretch and lift the weight a little bit. Unfortunately, the robot does not lift the weight all the way. This is because the mechanism is hanging at the front due to its weight. We have two solutions to this. The first one is to extend these frame beams but then the attachment will become too long and it would be hard to maneuvre through the field. Another solution is to add an extra point here where the weight will fall onto. So, I'll build it and show it to you. I have added these two wheels as pivot points for the attachment and now they are rotating. I will attach the scissor mechanism once again to the robot. and when I push it towards the model it stretches and lifts the weight all the way up. When I move it back, the attachment remains on the field. This is due to the friction between the tires and the beams. As you see, it's very difficult to rotate them. Another way to achieve this is to put a half bush between the beam and the tire.
Like this. Of course, you should also put a half bush on the outer side of the tire. I'll repeat the same thing on the other side. I put a half bush, then put the tire and finally put a half bush on the outer side. Now, when I push the mechanism towards the model, it lifts it all the way up. But when I move the robot back, the attachment remains on the construction. If you want to have no friction but still leave the attachment on the field, you could use this angled beam as a hook. I'll attach it here with this little friction pin.
Now, when I push it towards the model, the hook is flipped and when the robot returns, the attachment remains on the field. When we have the hook in place, the attachment will be left on the field. If you do not want to leave it on the field, just remove the angled beam.
Курсове и занятия включващи този Урок
Този Урок е използван в следните курсове и занятия.
FIRST LEGO League Competition. Attachments
This course is a collection of materials for many of the attachments that we've built at FLLCasts before introducing courses. The videos were built as separate different attachments for different competitions and with the following course, we try to give it a structure.
- 60
- 347:26
- 0

FIRST LEGO League 2012 Senior Solutions. Example soluations
Robotics competition is a large part of the FLL Competition. The field contains missions which give points and the main purpose is to gather maximum number of points for 2:30min. FIRST LEGO League competitions have different themes every year but the tasks have similar functionality. In this video tutorial we will give a brief of missions in Senior Solutions (the theme for 2012).
- 11
- 0
- 0
- 3d_rotation 5

FIRST LEGO League (FLL) 2012 Senior Solutions. Review of solutions with explanations
These are a couple of structured examples and tutorials of how the missions for FIRST LEGO League 2012 Senior Solutions competition could be accomplished. We've gathered recordings and explanations from which students and teacher can learn a lot. There are pinless attachments, categorization, heavy lifting, a lot of rubber bands and at the end we destroy the field at this robotics competition field mat.
- 10
- 61:21
- 0

Heavy lifting
How do you lift heavy objects with an attachment? In this episode we show a simple, interesting, but yet not very popular way to lift something heavy with and LEGO Mindstorms EV3 robot and without gears and motors as attachment. As a specific example we are using the Strength Exercise mission from the FIRST LEGO League 2012 competition.
- 1
- 0
- 0
- 3d_rotation 1

FIRST LEGO League with LEGO Education SPIKE Prime. "Challenge" competition for 9-16 years old
This is the most detailed course we've ever created on preparing for a FIRST LEGO League robotics competition. It focuses on using LEGO Education SPIKE Prime to build a simple Box Robot. The course includes 25 lessons, making it suitable for both beginners and advanced students. It builds on over 10 years of experience providing example solutions and explanations for FIRST LEGO League robotics competitions.
This course is one of the popular courses in the FIRST LEGO League Robot Game. The Complete Guide. We highly recommend checking out the full guide!
- 40
- 127:22
- 24

Automatically detached attachments
One of the simplest tricks in the game - move, complete the mission and leave the attachment with the mission model. You don't have to return the attachment to the base. On some competitions there might be penalties, but it might be worth it, as you save time to complete another mission. This works especially well with large attachments.. The attachment uses Luly, a small LEGO Education SPIKE Prime competition robot with 3D building instructions as a robot base.
- 2
- 0
- 1
- 3d_rotation 3
FIRST LEGO League 2020-2021 RePlay Solutions and review with SPIKE Prime
This course presents Solutions and Review of the FIRST LEGO League 2020-2021 RePlay competition. We do such a course every year after the competition. By moving through the course lessons, building the robot and attachment and completing the missions you will learn how to achieve FLL mission following good engineering principles for building robots, attachments and developing programs. Upon completion of the course you will have many new ideas about how to approach mission on every FLL robotics competition and how to help your team score more points.
- 74
- 158:11
- 15

M05. Basketball
In this video tutorial we accomplish the basketball mission from the FIRST LEGO League 2020 reply competition. We use the LEGO Education SPIKE Prime competition robot called Gazon. You will learn the principles of accomplishing a mission of two parts - put the ball in the basket and lift the basket.
- 6
- 0
- 1
- 3d_rotation 3

FIRST LEGO League with LEGO Mindstorms Robot Inventor. "Challenge" competition for 9-16 years old
The goal of this course is to take you through some of the most useful principles for building and using attachments to accomplish missions at FIRST LEGO League competitions. The whole course is based on a LEGO MINDSTORMS Robot Inventor and you need a single 51515 set and without additional parts (you will need a second color sensor for the lessons for using two color sensors, but feel free to skip them if you don't have it). For every mission there is a Scratch and Python program attachment. The course consists of 25 lessons suitable for beginner and advanced students. Every lessons consists of a video tutorial demonstrating the principle and how the mission could be accomplished along with building instructions for the robot, the attachment and programs for controlling the robot.
- 43
- 131:34
- 21

Automatically detached attachments
This video tutorial is about a detachable attachment. In various FIRST LEGO League competitions there are missions that could be accomplished with an attachment and when you accomplish the mission you must somehow leave the attachment along with the mission model. Probably as a support - most of the time it is as a support. But we've seen some pretty powerful concepts that include things like leaving a clock mechanism that will continue to work for 30 seconds accomplishing the mission.
- 2
- 0
- 1
- 3d_rotation 3